Paso 5: Widget Dashboard
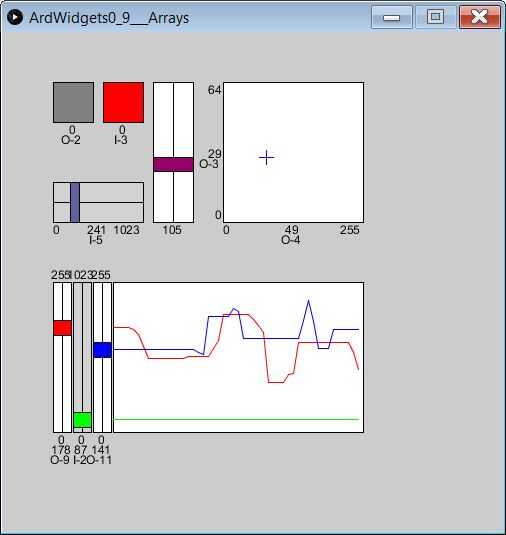
Aquí es un esquema con todos los widgets actuales. Usted puede simplemente comente las secciones de la configuración del widget si no desea usarlas o dejarlas en (no estar conectados a cualquier comportamiento de arduino si los pasadores asociados no cableados, pero que está bien a menos que desee utilizar las clavijas para otra cosa).
La lista completa de ArdWidgets actual es:
ArdWidgetButton - crea una salida o entrada Digital
ArdWidgetHSlider / ArdWidgetVSlider - crea y entrada analógica o salida
(Pines de entrada corresponden a la entrada analógica A0-A6)
ArdWidgetXY - toma una matriz de 2 pines de entrada analógica o salida
ArdWidgetGraph - toma una matriz de cualquier número de pines de entrada analógica y salida,
y una matriz de patrón de io correspondiente de valores de entrada y salida.
El código importante setup() que crea estos widgets es:
/////////////////////////////// Add Some Widgets ////////////////////////////// // Now add widgets to the ArdWidgetCollection. Basic signature is ( int x, int y, int w, int h, int anio, int apin): // Make an INPUT Button on Pin 2 // Single line of code creates a new button Widget and adds to the collection. myWidgets.add(new ArdWidgetButton (50, 50, 40, 40, INPUT, 2)); // Define an appropriate Widget variable in order to keep the reference and then change colors, display text, etc: // Make an OUTPUT Button on Pin 8 ArdWidgetButton button2 = new ArdWidgetButton (100, 50, 40, 40, OUTPUT, 8); button2.lowcolor = color(255,0,0); // set lowcolor to red button2.highcolor = color(0,255,0); // set highcolor to green myWidgets.add(button2); //Make an INPUT Horizontal Slider on Pin AO ArdWidgetHSlider slider3 = new ArdWidgetHSlider (50, 150, 90, 40, INPUT, 0); slider3.highcolor = color(0,0,255); slider3.displayscale = true; // add the scale text (show lowval and highval) myWidgets.add(slider3); //Make an INPUT Vertical Slider on Pin 9 // an INPUT widget's backround is grey by default; mouse interactions don't do anything ArdWidgetVSlider slider1 = new ArdWidgetVSlider(150, 50, 40, 140, OUTPUT, 9); slider1.lowcolor = color(255,0,0); // if lowcolor and highcolor are different, sliders will blend between them. slider1.highcolor = color(0,0,255); slider1.displayname = false; // Don't show the pin name myWidgets.add(slider1); // Note the ArdWidgetXY takes an array of 2 pins! ArdWidgetXY xy1 = new ArdWidgetXY (220, 50, 140, 140, OUTPUT, new int [] {10,11}); // Note how we pass the array of (2) pins xy1.highcolor = color(0,0,255); xy1.displayscale = true; xy1.lowval[Y] = 0; xy1.highval[Y] = 64; // We can set the range to something other // than the default 255 OUTPUT / 2013 INPUT myWidgets.add(xy1); // The ArdWidgetGraph - includes a dynamically created set of sliders and a time graph // Note we provide an array of ios and pins. The count of ios doesn't need to be the same as the pins ArdDefaultDisplayscale = true; myWidgets.add(new ArdWidgetGraph(50, 250, 310, 150, new int[] {OUTPUT, INPUT}, new int [] {3,2,5})); ArdDefaultDisplayscale = false; /////////////////////////////////// Done Adding Widgets ////////////////////////////

")
 sin Visual Studio de Microsoft Excel")


 para arduino")


 y Arduino incluyendo DHT11 biblioteca de interfaz.")

 para arduino uno")
