Paso 15: Código de Arduino
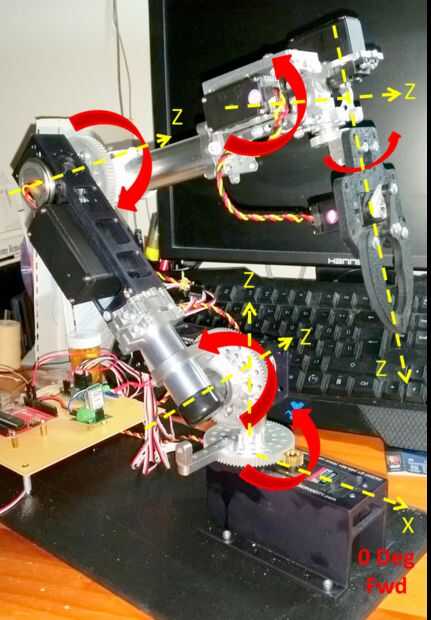
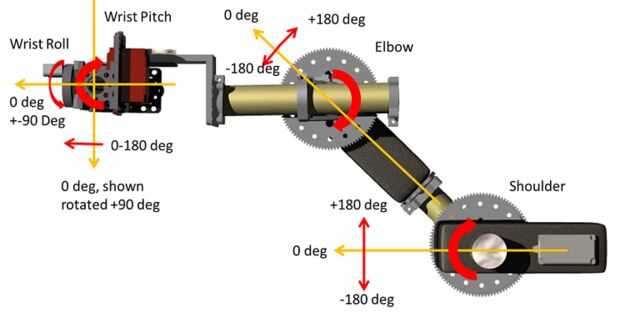
Veamos algunos de los elementos de lo sketch de Arduino antes de empezar a intentar utilizar para mover el brazo.
La primera es la de cómo decimos el bosquejo los parámetros para los servos, como estamos usando la biblioteca mini Maestro. Lo hice por configurar una matriz de estructuras, cada ajuste de los parámetros para el servo del brazo (líneas 31-43 del bosquejo
struct maestro_parameters { // servo_channel, name, min, max, home, speed, accel, and neutral come // directly from the min-maestro channel settings tab so it is a good // idea to take a screen shot and print it out. int servo_channel; char servo_name[20]; int servo_min; int servo_max; int servo_home; int servo_speed; int servo_accel; int servo_neutral; // The next two variables are required for Arduino mapping function. We will be mapping degrees to // microseconds. fromLow corresponds to the servo_min and and fromHigh corresponds to // servo_max. // If we use the shoulder as an example if your servo_min value is 672 microseconds, // which would correspond to +180 degrees and your servo_max value is 2248 microseconds // which corresponds to -180 degrees the fromLow and fromHigh values would be +180 // and -180 degrees respectively int servo_fromLow; int servo_fromHigh; // The next two variables are used to set the servo constraints. In, other //words the max allowable travel for each of servos int servo_constLow; int servo_constHigh; } servo[6]; Se establecen valores específicos para los servos en las líneas 66-71. Para mi brazo serían:
servo[0] = (maestro_parameters) {0, "Base", 1064, 1663, 1366, 0, 0, 1504, -90, 90, -80, 80}; servo[1] = (maestro_parameters) {1, "Shoulder", 672, 2248, 2040, 40, 0, 2040, -180, 180, -10, 180}; servo[2] = (maestro_parameters) {2, "Elbow", 928, 1872, 1738, 10, 0, 1505, 180, -180, -160, 45}; servo[3] = (maestro_parameters) {3, "Wrist_Pitch", 928, 2128, 928, 10, 0, 1500, 0, 180, 0, 180}; servo[4] = (maestro_parameters) {6, "Wrist_Rotate", 608, 2448, 1500, 40, 0, 1500, 90, -90, -90, 90}; servo[5] = (maestro_parameters) {7, "Gripper", 1312, 1792, 1358, 7, 0, 1500, 0, 10, 0, 10}; Vamos a hablar de la función de asignación durante unos segundos. En general las funciones de asignación es de la siguiente forma:
servoPosMs = 4*map(servoPosDeg, servo[servoNum].servo_fromLow, servo[servoNum].servo_fromHigh, servo[servoNum].servo_min, servo[servoNum].servo_max);
Como referencia que tenemos que multiplicar el valor de la asignación resultante por 4 desde la biblioteca del Maestro mini trabaja espera valores en incrementos de 1/4 microsegundos. Lo que encontré fue que la función de asignación era inexacta para los reductores de servo de hombro y codo, fue apagado por un par de grados que provocó imprecisiones en la colocación del brazo del servo. Lo que terminé haciendo es crear mis propias curvas de regresión lineal para estos servos e incrustándolos en la curva. Esto se hizo en función de moveServo() de dibujos.
Echemos un vistazo a esta función:
void moveServo() {/ los límites de la función de restringir el movimiento del servo para no saturar el brazo en posiciones te / / no quiero servoPosDeg = restringir (servoPosDeg, servo [servoNum] .servo_constLow, servo[servoNum].servo_constHigh); //Mini Maestro valores en 1/4 ms por lo tanto debes multiplicar por 4. if(servoNum == 1) {servoPosMs = 4*(4.4406*servoPosDeg+1491.1);} otro if(servoNum == 2) {servoPosMs = 4*(-2.4208*servoPosDeg+1436.2);} else {} void moveServo() { // The Constrain function limits the servo movement so you do not overdrive the arm into positions you // do not want servoPosDeg = constrain(servoPosDeg, servo[servoNum].servo_constLow, servo[servoNum].servo_constHigh); //Mini Maestro values given in 1/4 ms so you have to multiply by 4. if(servoNum == 1) { servoPosMs = 4*(4.4406*servoPosDeg+1491.1); } else if(servoNum == 2) { servoPosMs = 4*(-2.4208*servoPosDeg+1436.2); } else { servoPosMs = 4*map(servoPosDeg, servo[servoNum].servo_fromLow, servo[servoNum].servo_fromHigh, servo[servoNum].servo_min, servo[servoNum].servo_max); } //Serial.println(servoPosDeg); // setSpeed tells the servo how fast you want the servo to move, // set Target tells the servo where to move maestro.setSpeed((uint8_t) servo[servoNum].servo_channel, (uint16_t) servo[servoNum].servo_speed); maestro.setTarget((uint8_t) servo[servoNum].servo_channel, (uint16_t) servoPosMs); // The while loop is here to tell the sketch to wait till the servo has finished moving before // sending a done message while(maestro.getMovingState() == 1) { //Serial.println("Moving Servo"); }; //Serial.print ("Position is: "); //Serial.println (maestro.getPosition(servo[servoNum].servo_channel)); Serial.println ("Done"); }<p> Serial.println ("Done");</p><p>}</p> En el bosquejo publicado he comentado las líneas de regresión lineal. Usted tendrá que determinar si es necesario o no. Básicamente le dicen el servo para mover a los + 90 o -90 (dependiendo del servo) y ver si realmente es a 90 grados. Si usted se siente como si esto no es satisfactorio usar el centro de Control Maestro para colocar el servo en 0, 90 180 grados (ver figura), copiar los valores de microsegundo y usar MS Excel para hacer una línea de tendencia lineal (Asegúrese de decirle a él para demostrar la ecuación.
Para probar el bosquejo, cargar el sketch en Arduino. Cuando terminado de cargar abrir la serie comando ventana y enviar comandos a brazo en la siguiente forma:
servoNum, grados blanco
Ejemplo,
0, 25, luego presione la tecla de retorno
Esto mueve el servo de la base hacia la izquierda por 25 grados.
A modo de Resumen:
| Num de servo | Servo |
|---|---|
| 0 | Base |
| 1 | hombro |
| 2 | codo |
| 3 | lanzamiento de muñeca |
| 4 | gire la muñeca |
| 6 | pinza |
