Paso 6: código!
He incluido 4 archivos que puede descargar:
Brobot.apk:
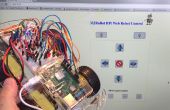
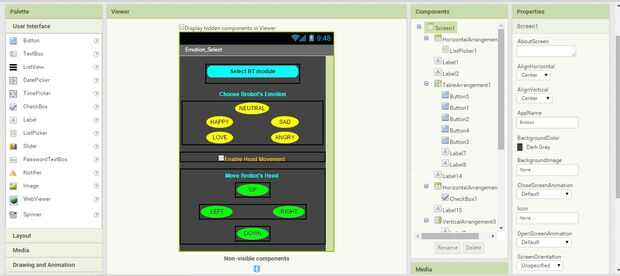
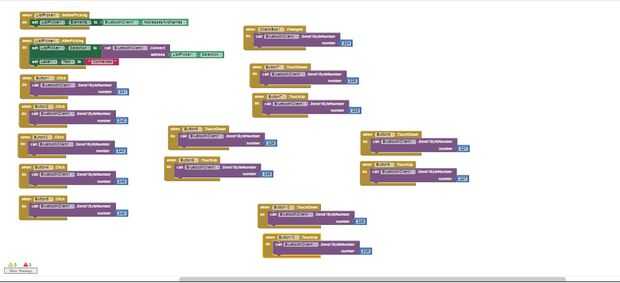
Esta es la aplicación que hice usando MIT App Inventor, una aplicación gratuita para android en línea IDE. Poner este archivo en tu dispositivo Android, y se mostrará como una aplicación. Por encima se verá cómo escribí esta aplicación en App Inventor. Usted puede diseñar el diseño de menús con botones y opciones de control, luego vas a una visión de bloque donde realmente se puede programar la aplicación usando bloques predefinidos. Esto hace que la programación sea muy fácil.
Brobot.zip:
Esta carpeta comprimida contiene Brobot.h y Brobot.cpp.
Brobot.h contiene las instancias de la función de clase Brobot, declaraciones de variables y mapas de la broca para todas las emociones que aparecen en los ojos de LED. Estos mapas de bits permiten cambiar cómo cada emoción se ve rápidamente cambiando cada bit individualmente.
Brobot.cpp contiene todas las definiciones de función de la clase Brobot. Las funciones más importantes aquí son:
updateFace: esta función controla qué emoción Brobot está mostrando actualmente y Qué emoción se muestra a continuación. También maneja el parpadea al azar y lo que está mostrando la pantalla LCD.
playComplete: esta función encarga de los sonidos Brobot hará dependiendo de sus emociones.
checkProx: esta es la función que determina si Brobot debe dejar inmediatamente lo que está haciendo y acto sorpresa. Genera un interrrupt.
brobot_sketch.zip:
Esta carpeta es auto explicativo. Contiene el bosquejo principal que escribí para Brobot. Básicamente, crea instancias de todos los contadores de tiempo y variables de Brobot y actualiza la cara cada bucle. También maneja todo el control de servo porque por alguna razón no podía conseguir los servos para trabajar en su propia función en Brobot.cpp. Los servos todos tienen variables ángulo actual y próxima que permiten los servos mover que una o menos veces siempre en bucle hasta que el ángulo actual es igual al ángulo neto.
BBSounds.zip:
Esta carpeta contiene todos los archivos de wav para cada sonido Brobot puede hacer. Para cargar estos en el protector de la onda, sólo pop la tarjeta SD, poner en su computadora y arrastrar y soltar los sonidos que desea utilizar para Brobot en la tarjeta SD. Entonces pop solo en el protector de la onda, cambio los nombres de archivo en el playComplete funcionan a los nombres de archivo que se ha cargado en la tarjeta y escuchar Brobot hacen ruidos divertidos! Todos los gratis abren fuente de sonidos se descargaron de th
/************************************************************* // Brobot: Header File
// This file contains the Brobot class function and variable
// declarations as well as the led bitmaps for each emotion // Programmer: Chris Frazier // Date: 4/8/2015 **************************************************************/
#ifndef BROBOT_H #define BROBOT_H
#include "Arduino.h" #include "C:\Users\ChristopherEvan\Documents\Arduino\libraries\Wire\Wire.h" #include "C:\Users\ChristopherEvan\Documents\Arduino\libraries\SoftwareServo\SoftwareServo.h" #include "C:\Users\ChristopherEvan\Documents\Arduino\libraries\Adafruit_LEDBackpack\Adafruit_LEDBackpack.h" #include "C:\Users\ChristopherEvan\Documents\Arduino\libraries\Adafruit_GFX\Adafruit_GFX.h" #include "C:\Users\ChristopherEvan\Documents\Arduino\libraries\WaveHC\FatReader.h" #include "C:\Users\ChristopherEvan\Documents\Arduino\libraries\WaveHC\SdReader.h" #include #include "C:\Users\ChristopherEvan\Documents\Arduino\libraries\WaveHC\WaveUtil.h" #include "C:\Users\ChristopherEvan\Documents\Arduino\libraries\WaveHC\WaveHC.h" #include "C:\Users\ChristopherEvan\Documents\Arduino\libraries\LiquidCrystal_I2C\LiquidCrystal_I2C.h"
// Each emotion is represented by an integer from 0 - 6 #define NEUTRAL 0xF0 #define HAPPY 0xF1 #define SAD 0xF2 #define ANGRY 0xF3 #define SURPRISED 0xF4 #define LOVE 0xF5 #define BLINK 0xF6 #define NECK_SPEED 1 #define MAX_TILT_ANGLE 135 #define MIN_TILT_ANGLE 65 #define MAX_PAN_ANGLE 120 #define MIN_PAN_ANGLE 40
class Brobot{ public: Brobot(byte, byte, byte, byte, byte, byte); //Constructor void setup(); void setEmotion(byte); // Allows main file to access current emotion void updateFace(); bool checkProx(); void playComplete(); void playFile(char*); byte freeRam(); void sdErrorCheck(); void checkBT(); SoftwareServo pan; SoftwareServo tilt; SoftwareServo leftBrow; SoftwareServo rightBrow; byte currentEmotion; byte nextEmotion; byte incomingByte; byte currentPanAngle; byte currentTiltAngle; byte nextPanAngle; byte nextTiltAngle; byte currentLBAngle; byte currentRBAngle; byte nextLBAngle; byte nextRBAngle; byte neckSpeed; byte neckTimer; bool headMoveToggle; bool upToggle; bool downToggle; bool leftToggle; bool rightToggle; bool soundToggle; bool togglePause; SdReader card; // This object holds the information for the card FatVolume vol; // This holds the information for the partition on the card FatReader root; // This holds the information for the filesystem on the card FatReader f; // This holds the information for the file we're play WaveHC wave; // This is the only wave (audio) object, since we will only play one at a time private: void displayString(const char *); byte previousEmotion; byte blinkTimer; byte surpriseTimer; byte triggerPin; byte echoPin; bool _setup; byte randSound; byte k; char myChar; }; #endif
static const uint8_t PROGMEM happyL_bmp[] = { B00000000, B00011100, B00100100, B01011100, B01011100, B00100100, B00011100, B00000000 }, happyR_bmp[] = { B00000000, B00011100, B00100100, B01011100, B01011100, B00100100, B00011100, B00000000 }, neutralL_bmp[] = { B00000000, B00111100, B01000010, B01011010, B01011010, B01000010, B00111100, B00000000 }, neutralR_bmp[] = { B00000000, B00111100, B01000010, B01011010, B01011010, B01000010, B00111100, B00000000 }, angryL_bmp[] = { B00000000, B00001100, B00010010, B00111010, B01011010, B11000010, B00111100, B00000000 }, angryR_bmp[] = { B00000000, B00111100, B11000010, B01011010, B00111010, B00010010, B00001100, B00000000 }, surprisedL_bmp[] = { B01111110, B10000001, B10000001, B10011001, B10011001, B10000001, B10000001, B01111110 }, surprisedR_bmp[] = { B01111110, B10000001, B10000001, B10011001, B10011001, B10000001, B10000001, B01111110 }, sadL_bmp[] = { B00000000, B00111100, B01000010, B01011010, B00111010, B00010010, B00001100, B00000000 }, sadR_bmp[] = { B00000000, B00001100, B00010010, B00111010, B01011010, B01000010, B00111100, B00000000 }, loveL_bmp[] = { B01111000, B10000100, B10000010, B01011001, B01011001, B10000010, B10000100, B01111000 }, loveR_bmp[] = { B01111000, B10000100, B10000010, B01011001, B01011001, B10000010, B10000100, B01111000 }, blink_bmp[] = { B00000000, B00000100, B00000010, B00000010, B00000010, B00000010, B00000100, B00000000 }; <p>/*************************************************************<br>// Brobot: Source File // This file contains the Brobot class function // definitions // Programmer: Chris Frazier // Date: 4/8/2015 **************************************************************/</p><p>#include "Brobot.h"</p><p>// Create led matrix instance using Adafruit's library Adafruit_8x16matrix ledmatrix = Adafruit_8x16matrix(); LiquidCrystal_I2C myDisplay = LiquidCrystal_I2C(0x27, 16, 2); // save some messages const char emotion[] PROGMEM = {"Emotion: "}; const char blank[] PROGMEM = {" "}; const char hello[] PROGMEM = {"Hello, "}; const char imBrobot[] PROGMEM = {"I'm Brobot! "}; const char neutral[] PROGMEM = {"NEUTRAL "}; const char happy[] PROGMEM = {"HAPPY "}; const char sad[] PROGMEM = {"SAD "}; const char angry[] PROGMEM = {"ANGRY "}; const char surprised[] PROGMEM = {"SURPRISED "}; const char love[] PROGMEM = {"LOVE "}; // Constructor: lets user set the pins Brobot::Brobot(byte pp, byte tp, byte lbp, byte rbp, byte ep, byte trgp){ triggerPin = trgp; echoPin = ep; neckTimer = 0; neckSpeed = NECK_SPEED; previousEmotion = NEUTRAL; currentEmotion = HAPPY; nextEmotion = HAPPY; pinMode(echoPin, INPUT); //set pinmodes for prox sensor pinMode(triggerPin, OUTPUT); soundToggle = false; togglePause = false; }</p><p>void Brobot::displayString(const char *message){ for (k = 0; k < 15; k++) { myChar = pgm_read_byte_near(message + k); myDisplay.print(myChar); } }</p><p>// Used during setup; initializes Brobot's face void Brobot::setup() { ledmatrix.begin(0x70); myDisplay.init(); //initialize the lcd myDisplay.backlight();//this turns the backlight on displayString(hello); //this sets the cursor of the display to the second row and 9th character position in that row myDisplay.setCursor(1,8); //then we print at the cursor position displayString(imBrobot); playComplete(); delay(2000); myDisplay.setCursor(0,0); displayString(emotion); myDisplay.setCursor(1,8); displayString(neutral); _setup = true; updateFace(); _setup = false; }</p><p>// Allows main file access to next emotion void Brobot::setEmotion(byte i) { nextEmotion = i; }</p><p>// Decides which emotion to display on Brobot's face void Brobot::updateFace() { // Generates random blinks if(currentEmotion != BLINK) { if(random(1000) == 0) { nextEmotion = BLINK; blinkTimer = 50; } } // decrements blink timer to make sure Brobot doesn't fall asleep! else if (currentEmotion == BLINK) { if(blinkTimer > 0) { blinkTimer--; } else { // Return to previous emotion after blink nextEmotion = previousEmotion; } } // check the prox sensor and surprise Brobot if(!_setup && !togglePause){ if (checkProx()) { nextEmotion = SURPRISED; surpriseTimer = 100; } // make sure Brobot doesn't go into shock! else if(!checkProx()){ if(surpriseTimer > 0) { surpriseTimer--; } else if(currentEmotion != BLINK){ if (nextEmotion == currentEmotion) { // Return to previous emotion after surprise nextEmotion = previousEmotion; } } } } // Change emotions if next emotion is different // This prevents from updating every loop and wasting power if (nextEmotion != currentEmotion) { if (nextEmotion == NEUTRAL) { ledmatrix.clear(); ledmatrix.drawBitmap(0, 0, neutralR_bmp, 8, 8, LED_ON); ledmatrix.writeDisplay(); ledmatrix.drawBitmap(0, 8, neutralL_bmp, 8, 8, LED_ON); ledmatrix.writeDisplay(); currentEmotion = NEUTRAL; previousEmotion = NEUTRAL; myDisplay.setCursor(1,8); displayString(neutral); soundToggle = true; } else if (nextEmotion == HAPPY) { ledmatrix.clear(); ledmatrix.drawBitmap(0, 0, happyR_bmp, 8, 8, LED_ON); ledmatrix.writeDisplay(); ledmatrix.drawBitmap(0, 8, happyL_bmp, 8, 8, LED_ON); ledmatrix.writeDisplay(); currentEmotion = HAPPY; previousEmotion = HAPPY; myDisplay.setCursor(1,8); displayString(happy); soundToggle = true; } else if (nextEmotion == SAD) { ledmatrix.clear(); ledmatrix.drawBitmap(0, 0, sadR_bmp, 8, 8, LED_ON); ledmatrix.writeDisplay(); ledmatrix.drawBitmap(0, 8, sadL_bmp, 8, 8, LED_ON); ledmatrix.writeDisplay(); currentEmotion = SAD; previousEmotion = SAD; myDisplay.setCursor(1,8); displayString(sad); soundToggle = true; } else if (nextEmotion == ANGRY) { ledmatrix.clear(); ledmatrix.drawBitmap(0, 0, angryR_bmp, 8, 8, LED_ON); ledmatrix.writeDisplay(); ledmatrix.drawBitmap(0, 8, angryL_bmp, 8, 8, LED_ON); ledmatrix.writeDisplay(); currentEmotion = ANGRY; previousEmotion = ANGRY; myDisplay.setCursor(1,8); displayString(angry); soundToggle = true; } else if (nextEmotion == SURPRISED) { ledmatrix.clear(); ledmatrix.drawBitmap(0, 0, surprisedR_bmp, 8, 8, LED_ON); ledmatrix.writeDisplay(); ledmatrix.drawBitmap(0, 8, surprisedL_bmp, 8, 8, LED_ON); ledmatrix.writeDisplay(); currentEmotion = SURPRISED; myDisplay.setCursor(1,8); displayString(surprised); soundToggle = true; } else if (nextEmotion == LOVE) { ledmatrix.clear(); ledmatrix.drawBitmap(0, 0, loveR_bmp, 8, 8, LED_ON); ledmatrix.writeDisplay(); ledmatrix.drawBitmap(0, 8, loveL_bmp, 8, 8, LED_ON); ledmatrix.writeDisplay(); currentEmotion = LOVE; previousEmotion = LOVE; myDisplay.setCursor(1,8); displayString(love); soundToggle = true; } else if (nextEmotion == BLINK) { ledmatrix.clear(); ledmatrix.drawBitmap(0, 0, blink_bmp, 8, 8, LED_ON); ledmatrix.writeDisplay(); ledmatrix.drawBitmap(0, 8, blink_bmp, 8, 8, LED_ON); ledmatrix.writeDisplay(); currentEmotion = BLINK; } }SoftwareServo::refresh(); }</p><p>// Check and see if someone is too close to Brobot bool Brobot::checkProx(){ digitalWrite(triggerPin, HIGH); // make a 10usec pulse delayMicroseconds(10);</p><p> digitalWrite(triggerPin, LOW);</p><p> float distance = pulseIn(echoPin, HIGH); //now read the pulse that is sent back by the sensor //pulseIn returns the pulse length in usec</p><p> distance = distance / 58; if (distance < 6){ return true; } else{ return false; } }</p><p>void Brobot::checkBT(){ while (Serial.available()) { delay(3); incomingByte = Serial.read(); } if ((incomingByte < 0xFE) && (incomingByte >= 0xE0)) { // Set emotion corresponding to byte received if (incomingByte > -1) { Serial.println(incomingByte); setEmotion(incomingByte); if(incomingByte == 0xE0) { headMoveToggle = !headMoveToggle; } if(incomingByte == 0xE1){ upToggle = !upToggle; } else if(incomingByte == 0xE3){ leftToggle = !leftToggle; } else if(incomingByte == 0xE2){ rightToggle = !rightToggle; } else if(incomingByte == 0xE4){ downToggle = !downToggle; } } incomingByte = -1; } }</p><p>// Plays a full file from beginning to end with no pause. void Brobot::playComplete() { // call our helper to find and play this name //SoftwareServo::refresh(); //delay(30);</p><p> if(currentEmotion == NEUTRAL){ randSound = random(1,15); if(randSound == 1) { playFile("NEUT1.WAV"); } else if(randSound == 2){ playFile("NEUT2.WAV"); } } else if(currentEmotion == HAPPY){ randSound = random(1,3); if(randSound == 1) { playFile("HAPPY1.WAV"); } else if(randSound == 2){ playFile("HAPPY2.WAV"); } else if(randSound == 3){ playFile("HAPPY3.WAV"); } } else if(currentEmotion == SAD){ randSound = random(1,3); if(randSound == 1) { playFile("SAD1.WAV"); } else if(randSound == 2){ playFile("SAD2.WAV"); } else if(randSound == 3){ playFile("SAD3.WAV"); } else if(randSound == 4){ playFile("SAD4.WAV"); } } else if(currentEmotion == ANGRY){ randSound = random(1,3); if(randSound == 1) { playFile("ANGRY1.WAV"); } else if(randSound == 2){ playFile("ANGRY2.WAV"); } else if(randSound == 3){ playFile("ANGRY3.WAV"); } } else if(currentEmotion == SURPRISED){ randSound = random(1,6); if(randSound == 1) { playFile("SURP1.WAV"); } else if(randSound == 2){ playFile("SURP2.WAV"); } else if(randSound == 3){ playFile("SURP3.WAV"); } else if(randSound == 4){ playFile("SURP4.WAV"); } else if(randSound == 5){ playFile("SURP6.WAV"); } else if(randSound == 6){ playFile("SURP6.WAV"); } } else if(currentEmotion == LOVE){ randSound = random(1,3); if(randSound == 1) { playFile("LOVE1.WAV"); } else if(randSound == 2){ playFile("LOVE2.WAV"); } else if(randSound == 3){ playFile("LOVE3.WAV"); } }soundToggle = false;</p><p> while(wave.isplaying) { // pause } // now its done playing } void Brobot::playFile(char *name) { // see if the wave object is currently doing something if (wave.isplaying) {// already playing something, so stop it! wave.stop(); // stop it } // look in the root directory and open the file if (!f.open(root, name)) { putstring("Couldn't open file "); Serial.print(name); return; } // OK read the file and turn it into a wave object if (!wave.create(f)) { putstring_nl("Not a valid WAV"); return; } // ok time to play! start playback wave.play(); } // this handy function will return the number of bytes currently free in RAM, great for debugging! byte Brobot::freeRam(void) { extern int __bss_end; extern int *__brkval; int free_memory; if((int)__brkval == 0) { free_memory = ((int)&free_memory) - ((int)&__bss_end); } else { free_memory = ((int)&free_memory) - ((int)__brkval); } return free_memory; } </p><p>void Brobot::sdErrorCheck(void) { if (!card.errorCode()) return; putstring("\n\rSD I/O error: "); Serial.print(card.errorCode(), HEX); putstring(", "); Serial.println(card.errorData(), HEX); while(1); }</p><p>/*************************************************************<br>// Brobot: Main File // This file contains the setup and execution loop for the Arduino // while Brobot is in operation. // Programmer: Chris Frazier // Date: 4/8/2015 **************************************************************/</p><p>#include "Wire.h" #include "SoftwareServo.h" #include "Adafruit_LEDBackpack.h" #include "Adafruit_GFX.h" #include #include #include "WaveHC.h"</p><p>#define panPin 14 // This is the pan servo pin #define tiltPin 15 // This is the tilt servo pin #define leftBrowPin 16 // This is the left eyebrow servo pin #define rightBrowPin 17 // This is the right eyebrow servo pin #define echoPin 8 // This is the echo pin #define triggerPin 7 // This is the trigger pin</p><p>// Create an instance of Brobot Brobot myBrobot(panPin, tiltPin, leftBrowPin, rightBrowPin, echoPin, triggerPin);</p><p>void setup() { Serial.begin(9600); // Set baud rate for serial protocol putstring("Free RAM: "); // This can help with debugging, running out of RAM is bad Serial.println(myBrobot.freeRam()); // if this is under 150 bytes it may spell trouble! // Set the output pins for the DAC control. This pins are defined in the library pinMode(2, OUTPUT); pinMode(3, OUTPUT); pinMode(4, OUTPUT); pinMode(5, OUTPUT); // if (!card.init(true)) { //play with 4 MHz spi if 8MHz isn't working for you if (!myBrobot.card.init()) { //play with 8 MHz spi (default faster!) putstring_nl("Card init. failed!"); // Something went wrong, lets print out why myBrobot.sdErrorCheck(); while(1); // then 'halt' - do nothing! } // enable optimize read - some cards may timeout. Disable if you're having problems myBrobot.card.partialBlockRead(true); // Now we will look for a FAT partition! uint8_t part; for (part = 0; part < 5; part++) { // we have up to 5 slots to look in if (myBrobot.vol.init(myBrobot.card, part)) break; // we found one, lets bail } if (part == 5) { // if we ended up not finding one :( putstring_nl("No valid FAT partition!"); myBrobot.sdErrorCheck(); // Something went wrong, lets print out why while(1); // then 'halt' - do nothing! } // Lets tell the user about what we found putstring("Using partition "); Serial.print(part, DEC); putstring(", type is FAT"); Serial.println(myBrobot.vol.fatType(),DEC); // FAT16 or FAT32? // Try to open the root directory if (!myBrobot.root.openRoot(myBrobot.vol)) { putstring_nl("Can't open root dir!"); // Something went wrong, while(1); // then 'halt' - do nothing! } // Initialize all of Brobot's public variables myBrobot.incomingByte = -1; myBrobot.currentPanAngle = 90; myBrobot.currentTiltAngle = 90; myBrobot.nextPanAngle = 90; myBrobot.nextTiltAngle = 90; myBrobot.currentLBAngle = 90; myBrobot.currentRBAngle = 90; myBrobot.neckTimer = 400; myBrobot.neckSpeed = NECK_SPEED; myBrobot.headMoveToggle = 0; myBrobot.leftToggle = 0; myBrobot.rightToggle = 0; myBrobot.upToggle = 0; myBrobot.downToggle = 0; // Run Brobot setup function (initializes LED eyes) myBrobot.setup(); // Attach and initialize all 4 servos myBrobot.pan.attach(panPin); myBrobot.tilt.attach(tiltPin); myBrobot.leftBrow.attach(leftBrowPin); myBrobot.rightBrow.attach(rightBrowPin); myBrobot.pan.write(myBrobot.currentPanAngle); delay(20); myBrobot.tilt.write(myBrobot.currentTiltAngle); myBrobot.leftBrow.write(myBrobot.currentLBAngle); myBrobot.rightBrow.write(myBrobot.currentRBAngle); //SoftwareServo::refresh(); delay(20); myBrobot.updateFace(); delay(2000); SoftwareServo::refresh(); } void loop() { // Every loop check for Bluetooth data myBrobot.checkBT(); // The following code sets Brobot's eyebrow positions // - - if(myBrobot.nextEmotion == NEUTRAL) { //myBrobot.togglePause = true; myBrobot.nextLBAngle = 90; myBrobot.nextRBAngle = 90; while((myBrobot.currentLBAngle != myBrobot.nextLBAngle) || (myBrobot.currentRBAngle != myBrobot.nextRBAngle)){ if(myBrobot.currentLBAngle < myBrobot.nextLBAngle){ myBrobot.currentLBAngle++; } else if(myBrobot.currentLBAngle > myBrobot.nextLBAngle){ myBrobot.currentLBAngle--; } if(myBrobot.currentRBAngle < myBrobot.nextRBAngle){ myBrobot.currentRBAngle++; } else if(myBrobot.currentRBAngle > myBrobot.nextRBAngle){ myBrobot.currentRBAngle--; } myBrobot.leftBrow.write(myBrobot.currentLBAngle); myBrobot.rightBrow.write(myBrobot.currentRBAngle); SoftwareServo::refresh(); } //if((myBrobot.currentLBAngle == myBrobot.nextLBAngle) && (myBrobot.currentRBAngle == myBrobot.nextRBAngle)){ // myBrobot.togglePause = false; //} } // / \ else if(myBrobot.nextEmotion == SURPRISED || myBrobot.nextEmotion == HAPPY || myBrobot.nextEmotion == SAD || myBrobot.nextEmotion == LOVE) { //myBrobot.togglePause = true; myBrobot.nextLBAngle = 120; myBrobot.nextRBAngle = 60; while((myBrobot.currentLBAngle != myBrobot.nextLBAngle) || (myBrobot.currentRBAngle != myBrobot.nextRBAngle)){ if(myBrobot.currentLBAngle < myBrobot.nextLBAngle){ myBrobot.currentLBAngle++; } else if(myBrobot.currentLBAngle > myBrobot.nextLBAngle){ myBrobot.currentLBAngle--; } if(myBrobot.currentRBAngle < myBrobot.nextRBAngle){ myBrobot.currentLBAngle++; } else if(myBrobot.currentRBAngle > myBrobot.nextRBAngle){ myBrobot.currentRBAngle--; } myBrobot.leftBrow.write(myBrobot.currentLBAngle); myBrobot.rightBrow.write(myBrobot.currentRBAngle); SoftwareServo::refresh(); } //if((myBrobot.currentLBAngle == myBrobot.nextLBAngle) && (myBrobot.currentRBAngle == myBrobot.nextRBAngle)){ // myBrobot.togglePause = false; //} } // \ / else if(myBrobot.nextEmotion == ANGRY) { //myBrobot.togglePause = true; myBrobot.nextLBAngle = 60; myBrobot.nextRBAngle = 120; while((myBrobot.currentLBAngle != myBrobot.nextLBAngle) || (myBrobot.currentRBAngle != myBrobot.nextRBAngle)){ if(myBrobot.currentLBAngle < myBrobot.nextLBAngle){ myBrobot.currentLBAngle++; } else if(myBrobot.currentLBAngle > myBrobot.nextLBAngle){ myBrobot.currentLBAngle--; } if(myBrobot.currentRBAngle < myBrobot.nextRBAngle){ myBrobot.currentRBAngle++; } else if(myBrobot.currentRBAngle > myBrobot.nextRBAngle){ myBrobot.currentRBAngle--; } myBrobot.leftBrow.write(myBrobot.currentLBAngle); myBrobot.rightBrow.write(myBrobot.currentRBAngle); SoftwareServo::refresh(); } //if((myBrobot.currentLBAngle == myBrobot.nextLBAngle) && (myBrobot.currentRBAngle == myBrobot.nextRBAngle)){ // myBrobot.togglePause = false; //} } SoftwareServo::refresh(); // Update Brobot's face each loop myBrobot.updateFace(); /* The following code controls the pan/tilt neck servos // Brobot will randomly look in a defined set of angles for both pan and tilt. // Each loop, if the current servo position variable is not at the same position // as the next position variable, the servos will increment/decrement the current // angle by 1 as needed. The neckSpeed variable causes the pan/tilt servos to only // change every *neckspeed* loop cycle. The neckTimer variable causes Brobot to pause // before looking in another direction. */ if(myBrobot.headMoveToggle == 0){ if (myBrobot.currentPanAngle == myBrobot.nextPanAngle){ if(myBrobot.neckTimer == 0){ myBrobot.nextPanAngle = random(MIN_PAN_ANGLE, MAX_PAN_ANGLE); myBrobot.nextTiltAngle = random(MIN_TILT_ANGLE, MAX_TILT_ANGLE); } else { myBrobot.neckTimer--; } } else { myBrobot.neckSpeed--; myBrobot.neckTimer = random(60, 80); if(myBrobot.neckSpeed == 0){ if(millis() % 2 == 0) { if(myBrobot.currentPanAngle < myBrobot.nextPanAngle){ myBrobot.currentPanAngle++; } else if(myBrobot.currentPanAngle > myBrobot.nextPanAngle){ myBrobot.currentPanAngle--; } myBrobot.pan.write(myBrobot.currentPanAngle); SoftwareServo::refresh(); //delay(10); } else { if(myBrobot.currentTiltAngle < myBrobot.nextTiltAngle){ myBrobot.currentTiltAngle++; } else if(myBrobot.currentTiltAngle > myBrobot.nextTiltAngle){ myBrobot.currentTiltAngle--; } myBrobot.tilt.write(myBrobot.currentTiltAngle); SoftwareServo::refresh(); } myBrobot.neckSpeed = NECK_SPEED; } } } else { myBrobot.neckSpeed--; if(myBrobot.neckSpeed == 0){ if(myBrobot.currentTiltAngle <= MAX_TILT_ANGLE) { if(myBrobot.upToggle){ myBrobot.currentTiltAngle++; } } if(myBrobot.currentTiltAngle >= MIN_TILT_ANGLE) { if(myBrobot.downToggle){ myBrobot.currentTiltAngle--; } } if(myBrobot.currentPanAngle <= MAX_PAN_ANGLE) { if(myBrobot.rightToggle){ myBrobot.currentPanAngle++; } } if(myBrobot.currentPanAngle >= MIN_PAN_ANGLE) { if(myBrobot.leftToggle){ myBrobot.currentPanAngle--; } } myBrobot.pan.write(myBrobot.currentPanAngle); myBrobot.tilt.write(myBrobot.currentTiltAngle); SoftwareServo::refresh(); delay(10); myBrobot.neckSpeed = NECK_SPEED; } } if(myBrobot.soundToggle && !myBrobot.togglePause){ SoftwareServo::refresh(); //delay(200); myBrobot.playComplete(); } }</p>
