Paso 11: El Arduino código
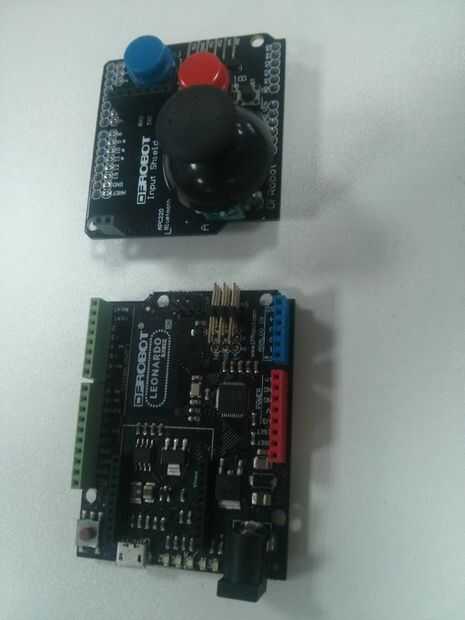
Este paso es bastante sencillo, conecte la Junta Directiva de Leonardo y subir uno de los bocetos de Leonardo USB. He editado para las clavijas que necesito. Quería usar DFRobot nova, pero no he podido encontrar sin el kit. Está siendo agradable usar el acelerómetro como ratón y sólo tiene que añadir un par de botones. De todos modos, aquí es si desea comprobar. Comentarios lo explica todo.
<p>/*<br> JoystickMouseControl Controls the mouse from a joystick on an Arduino Leonardo. Uses a pushbutton to turn on and off mouse control, and a second pushbutton to click the left mouse button Hardware: * 2-axis joystick connected to pins A0 and A1 * pushbuttons connected to pin D2 and D3 The mouse movement is always relative. This sketch reads two analog inputs that range from 0 to 1023 (or less on either end) and translates them into ranges of -6 to 6. The sketch assumes that the joystick resting values are around the middle of the range, but that they vary within a threshold. WARNING: When you use the Mouse.move() command, the Arduino takes over your mouse! Make sure you have control before you use the command. This sketch includes a pushbutton to toggle the mouse control state, so you can turn on and off mouse control. created 15 Sept 2011 updated 28 Mar 2012 by Tom Igoe this code is in the public domain *</p><p>/ set pin numbers for switch, joystick axes, and LED: const int switchPin = 4; // switch to turn on and off mouse control const int mouseButton = 3; // input pin for the mouse pushButton const int xAxis = A0; // joystick X axis const int yAxis = A1; // joystick Y axis const int ledPin = 13; // Mouse control LED </p><p>// parameters for reading the joystick: int range = 12; // output range of X or Y movement int responseDelay = 5; // response delay of the mouse, in ms int threshold = range/4; // resting threshold int center = range/2; // resting position value</p><p>boolean mouseIsActive = false; // whether or not to control the mouse int lastSwitchState = LOW; // previous switch state</p><p>void setup() { pinMode(switchPin, INPUT); // the switch pin pinMode(ledPin, OUTPUT); // the LED pin // take control of the mouse: Mouse.begin(); }</p><p>void loop() { // read the switch: int switchState = digitalRead(switchPin); // if it's changed and it's high, toggle the mouse state: if (switchState != lastSwitchState) { if (switchState == HIGH) { mouseIsActive = !mouseIsActive; // turn on LED to indicate mouse state: digitalWrite(ledPin, mouseIsActive); } } // save switch state for next comparison: lastSwitchState = switchState;</p><p> // read and scale the two axes: int xReading = readAxis(A0); int yReading = readAxis(A1);</p><p> // if the mouse control state is active, move the mouse: if (mouseIsActive) { Mouse.move(xReading, yReading, 0); } </p><p> // read the mouse button and click or not click: // if the mouse button is pressed: if (digitalRead(mouseButton) == HIGH) { // if the mouse is not pressed, press it: if (!Mouse.isPressed(MOUSE_LEFT)) { Mouse.press(MOUSE_LEFT); } } // else the mouse button is not pressed: else { // if the mouse is pressed, release it: if (Mouse.isPressed(MOUSE_LEFT)) { Mouse.release(MOUSE_LEFT); } }</p><p> delay(responseDelay); }</p><p>/* reads an axis (0 or 1 for x or y) and scales the analog input range to a range from 0 to <range> */</range></p><p>int readAxis(int thisAxis) { // read the analog input: int reading = analogRead(thisAxis);</p><p> // map the reading from the analog input range to the output range: reading = map(reading, 0, 1023, 0, range);</p><p> // if the output reading is outside from the // rest position threshold, use it: int distance = reading - center;</p><p> if (abs(distance) < threshold) { distance = 0; } </p><p> // return the distance for this axis: return distance; }</p> Sólo tiene que enchufar en el USB y está listo para usar.


