Paso 11: Arduino - código
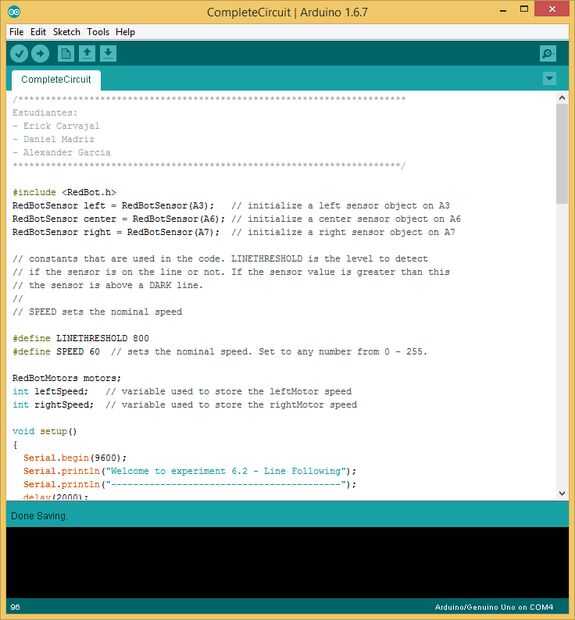
El siguiente código fue editado usando Arduino 1.6.7. Este es el listado completo del código.
#include RedBotSensor left = RedBotSensor(A3); // initialize a left sensor object on A3 RedBotSensor center = RedBotSensor(A6); // initialize a center sensor object on A6 RedBotSensor right = RedBotSensor(A7); // initialize a right sensor object on A7// constants that are used in the code. LINETHRESHOLD is the level to detect // if the sensor is on the line or not. If the sensor value is greater than this // the sensor is above a DARK line. // // SPEED sets the nominal speed#define LINETHRESHOLD 800 #define SPEED 60 // sets the nominal speed. Set to any number from 0 - 255. #define CORRECTIONFACTOR 10 #define ADJUSTMENTTHRESHOLD 4000 //milliseconds to start an adjustment in advance RedBotMotors motors; int leftSpeed; // variable used to store the leftMotor speed int rightSpeed; // variable used to store the rightMotor speed unsigned long startTime; int correctionIndex = 0; int correctionCounter=0; unsigned long corrections[20]; int correctionsDir[20]; char action; bool ticket=false; void setup() { Serial.begin(9600); Serial.println("Welcome to experiment - Line Following"); Serial.println("------------------------------------------"); delay(2000); Serial.println("IR Sensor Readings: "); delay(500); startTime = millis(); corrections[0] = 0; leftSpeed=-SPEED; rightSpeed=SPEED; }void loop() {// Serial.print(left.read()); // Serial.print("\t"); // tab character // Serial.print(center.read()); // Serial.print("\t"); // tab character // Serial.print(right.read()); // Serial.println(); // Serial.print("Action: "); // tab character // Serial.print(action); // Serial.println(); if (action == 'g') { // if all sensors are on black or up in the air, stop the motors. // otherwise, run motors given the control speeds above. if ((left.read() > LINETHRESHOLD) || (center.read() > LINETHRESHOLD) ) { turn(0); } else if ( (center.read() > LINETHRESHOLD) || (right.read() > LINETHRESHOLD) ) { turn(1); } else { applyAdjustment(nextCorrection()); motors.leftMotor(leftSpeed); motors.rightMotor(rightSpeed); } delay(0); // add a delay to decrease sensitivity. } else { startTime = millis(); motors.brake(); } }void turn(int direct) { if (correctionCounter>=0)correctionCounter--; int adjust= correctionCounter*500; addCorrection(direct,adjust); motors.stop(); leftSpeed = 200; rightSpeed = -200; motors.leftMotor(leftSpeed); motors.rightMotor(rightSpeed); delay(100); if (direct == 0) { leftSpeed = -(SPEED - 50) * 2; } else { rightSpeed = SPEED - 50 * 2; } motors.leftMotor(leftSpeed); motors.rightMotor(rightSpeed); delay(250); leftSpeed = -SPEED; rightSpeed = SPEED; }void addCorrection(int Direction,int correctionTime) { corrections[correctionIndex] = millis() - startTime-correctionTime; correctionsDir[correctionIndex] = Direction; Serial.println("correction"); Serial.println(corrections[correctionIndex]); Serial.println(correctionsDir[correctionIndex]); correctionIndex++; correctionCounter++; }int nextCorrection() { int i = 0; unsigned long currentTime = millis() - startTime; while ((corrections[i] < currentTime) && (i < correctionIndex)) i++; return i; }void applyAdjustment( int nextCorrectionIndex) { unsigned long currentTime = millis() - startTime; unsigned long remainingTime = corrections[nextCorrectionIndex] - currentTime; //Time to correct if (remainingTime < ADJUSTMENTTHRESHOLD) { if (correctionsDir[nextCorrectionIndex] == 1) { rightSpeed = SPEED + applyWeight(remainingTime); leftSpeed = -(SPEED - applyWeight(remainingTime)); } else { rightSpeed = SPEED - applyWeight(remainingTime); leftSpeed = -(SPEED + applyWeight(remainingTime)); } ticket=true; } else if((currentTime > corrections[nextCorrectionIndex]) && (ticket==true)) { ticket=false; correctionIndex++; } else{ //No correction leftSpeed = -SPEED; rightSpeed = SPEED; } }int applyWeight(int wRemainingTime){ unsigned long currentTime = millis() - startTime; //int remainingTime=(int)abs(correctionsDir[nextCorrectionIndex]-currentTime); int newSpeed =0; if ((wRemainingTime=2000)){ newSpeed=CORRECTIONFACTOR*1; } else if ((wRemainingTime<2000)&(wRemainingTime>=1000)){ newSpeed=CORRECTIONFACTOR*2; } else if ((wRemainingTime<1000)&(wRemainingTime>=400)){ newSpeed=CORRECTIONFACTOR*3; } else if (wRemainingTime<400){ newSpeed=CORRECTIONFACTOR*1; } return newSpeed; }void serialEvent() { if (Serial.available()) { action = (char)Serial.read(); if (action == 'g') { correctionIndex=0; correctionCounter=0; } Serial.println("EVENTO"); } } El código en el método de "setup" es el código estándar regular para establecer comunicación con puertos serie e información de diagnóstico. Las "demoras" son importantes por lo que da tiempo a todo el sistema a y corriente.
El código de "loop"
El código loop está a cargo de mirar continuamente el valor de los sensores. Cuando uno de esos sensores alcanza un umbral predefinido el robot debe tomar las acciones apropiadas.
Si el sensor de la izquierda llega a la cinta (umbral), entonces, el robot debe girar a la derecha. Asimismo, si el sensor de la derecha llega a la cinta (umbral), el robot debe girar a la izquierda.
El robot utiliza una base de conocimiento donde registra la hora cuando se estrelló contra la línea. Durante cada ejecución, el robot registra cada accidente en el futuro buscará en su base de conocimiento para "look-ahead" se ejecuta para accidentes y corrige su trayectoria.
También hay "ajustes". Por ejemplo, digamos en la primera carrera el robot se estrelló en segundos 4 y 9. En el accidente en el segundo 4 el robot tuvo que regresar un poco para corregir el camino y por lo tanto pierde algo de tiempo. Eso significa que la caída en el segundo 9 pasaría a una hora distinta en los funcionamientos próximos si se evita la caída en el segundo 4. Esta instancia de "evitación" es rastreada en la variable "correctionCounter". También se realiza el seguimiento de la dirección de la corrección.
El método de "applyWeight" se utiliza para añadir un peso a la velocidad de corrección dependiendo de cuán cerca estamos al siguiente desplome previsto. El más cercano al siguiente desplome más rápido el ajuste debe ocurrir.
El código de "vuelta"
Este código hace que el robot gire a la izquierda o la derecha según los argumentos pasados a él. El trabajo real en este código debe ser capaz de determinar la distancia y la velocidad para moverse con el fin de volver al buen camino. Esto es determinado básicamente por el enfoque de prueba y error.
Ver cómo la velocidad del motor se establece inicialmente en una base de 200 y -200 para los motores izquierdos y derecho respectivamente. Estos valores en la velocidad hará que el robot vaya hacia atrás.
Dependiendo de la dirección al girar, se recalcula el valor de la velocidad para un motor u otro. Esta es la manera de que hacer el robot para volver en pista.
Tan simple como puede parecerse a este código, esto hace que el robot para recorrer cualquier tipo de camino y al llegar a su fin, puede encontrar su manera alrededor para volver atrás y comenzar el camino otra vez.

