Paso 5: programación
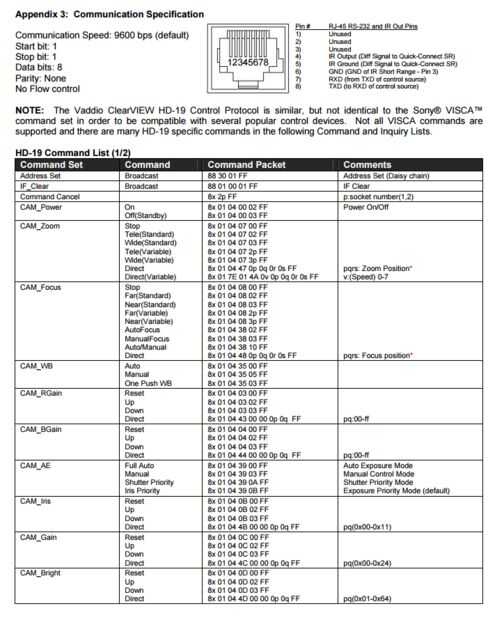
Muchas cámaras por RS232 señalización uso comandos hexadecimales. Estos comandos son enviados a la cámara como una serie de bytes hexagonales. Arriba se muestra una instantánea del manual que enumera algunos de los comandos.
Se crea una matriz de bytes hex para cada comando que desee utilizar. Cuando se utiliza el comando es importante igualar la velocidad en baudios del dispositivo y enviar secuencialmente cada byte en la matriz. El manual se ve que la tasa de baudios es 9600 bps por lo tanto es lo que se especificó en el código. También es importante especificar qué puertos usas para TX y RX. Esto se hace cuando se configura un SoftwareSerial.
Este código de ejemplo siguiente tiene la cámara alternando entre 2 posiciones predefinidas cada cinco segundos.
// Serial Communication // October 29, 2015 // Purpose: Control the camera position using RS232 communications through a DB9 connector // with an attached RS232 Shield. // Status: WORKING#include <SoftwareSerial.h>// Do not use 0 and 1 if you want to be able to upload code while shield is attached to Arduino SoftwareSerial mySerial(2, 3); //2 is TX, 3 is RX // Camera Commands // Default message 8x 01 04 3F 02 0p FF where x is camera number and p is preset number byte preset1[7] = {0x81, 0x01, 0x04, 0x3F, 0x02, 0x01, 0xFF}; // Camera 1 preset byte preset2[7] = {0x81, 0x01, 0x04, 0x3F, 0x02, 0x02, 0xFF}; // Camera 2 presetbyte address_command[4] = {0x88, 0x30, 0x01, 0xFF}; // Sets camera address (Needed for Daisy Chaining) byte if_clear[5] = {0x88, 0x01, 0x00, 0x01, 0xFF}; // Checks to see if communication line is clearint delayTime = 500; //Time between commandsvoid setup() { Serial.begin(9600); // Serial Communication w/ Computer for Debugging mySerial.begin(9600); // Serial Communication w/ Camera //Send Address command for (int i = 0; i < 4; i++) { mySerial.write(address_command[i]); Serial.println("Address Byte Sent"); } delay(delayTime); //delay to allow camera time for next command //Send IF_clear command for (int i = 0; i < 5; i++) { mySerial.write(if_clear[i]); Serial.println("If Clear Byte Sent"); } }void loop() { for (int i = 0; i < (sizeof(preset1)); i++) // sizeof returns a count of bytes, not numbers if using int, float, or long { mySerial.write(preset1[i]); // sends each byte sequentially Serial.println("Camera Position 1 Byte Sent"); } delay(5000); // Waits for 5 seconds for (int i = 0; i < (sizeof(preset2)); i++) // sizeof returns a count of bytes, not numbers if using int, float, or long { mySerial.write(preset2[i]); // sends each byte sequentially Serial.println("Set Camera Position 2 Byte Sent"); } delay(5000); } El segundo ejemplo de código le permite controlar la dirección en la cual las cacerolas de la cámara enviando comandos a través de la ventana de terminal en su computadora.
// Serial Communication // October 30, 2015 // Purpose: Control the camera position using keyboard inputs // Status: WORKING#include <SoftwareSerial.h>// Do not use 0 and 1 if you want to be able to upload code while shield is attached to Arduino SoftwareSerial mySerial(2, 3); //2 is TX, 3 is RX // Camera Commands // Default message 8x 01 04 3F 02 0p FF where x is camera number and p is preset number byte preset1[7] = {0x81, 0x01, 0x04, 0x3F, 0x02, 0x01, 0xFF}; // Camera 1 preset byte preset2[7] = {0x81, 0x01, 0x04, 0x3F, 0x02, 0x02, 0xFF}; // Camera 2 preset// Camera Controls byte panLeft[9] = {0x81, 0x01, 0x06, 0x01, 0x09, 0x09, 0x01, 0x03, 0xFF}; // Pan Camera Left byte panRight[9] = {0x81, 0x01, 0x06, 0x01, 0x09, 0x09, 0x02, 0x03, 0xFF}; // Pan Camera Right byte panUp[9] = {0x81, 0x01, 0x06, 0x01, 0x09, 0x09, 0x03, 0x01, 0xFF}; // Pan Camera Up byte panDown[9] = {0x81, 0x01, 0x06, 0x01, 0x09, 0x09, 0x03, 0x02, 0xFF}; // Camera Pan Down byte panStop[9] = {0x81, 0x01, 0x06, 0x01, 0x09, 0x09, 0x03, 0x03, 0xFF}; // Camera Pan Downbyte address_command[4] = {0x88, 0x30, 0x01, 0xFF}; // Sets camera address (Needed for Daisy Chaining) byte if_clear[5] = {0x88, 0x01, 0x00, 0x01, 0xFF}; // Checks to see if communication line is clearint delayTime = 500; //Time between commandsvoid setup() { Serial.begin(9600); // Serial Communication w/ Computer for Debugging mySerial.begin(9600); // Serial Communication w/ Camera //Send Address command for (int i = 0; i < 4; i++) { mySerial.write(address_command[i]); } delay(delayTime); //delay to allow camera time for next command //Send IF_clear command for (int i = 0; i < 5; i++) { mySerial.write(if_clear[i]); } Serial.print("Please Input Commands"); }void loop() { // Checks for serial input from terminal if (Serial.available() > 0) { char inChar = Serial.read(); // read incoming serial data: if (inChar == '1') // Camera Preset 1 { for (int i = 0; i < (sizeof(preset1)); i++) { mySerial.write(preset1[i]); // sends each byte sequentially } } else if (inChar == '2') // Camera Preset 1 { for (int i = 0; i < (sizeof(preset2)); i++) { mySerial.write(preset2[i]); } } else if (inChar == 'w') // Pan Camera Up { for (int i = 0; i < (sizeof(panUp)); i++) { mySerial.write(panUp[i]); } } else if (inChar == 'a') // Pan Camera Left { for (int i = 0; i < (sizeof(panLeft)); i++) { mySerial.write(panLeft[i]); } } else if (inChar == 's') // Pan Camera Down { for (int i = 0; i < (sizeof(panDown)); i++) { mySerial.write(panDown[i]); } } else if (inChar == 'd') // Pan Camera Right { for (int i = 0; i < (sizeof(panRight)); i++) { mySerial.write(panRight[i]); } } else if (inChar == 'q') // Stop Camera Pan { for (int i = 0; i < (sizeof(panStop)); i++) { mySerial.write(panStop[i]); } } } }


![Servomotor de control de las Naciones Unidas con un Arduino Nano y el acelerómetro ADXL345 [En Español] [Ecuador] Servomotor de control de las Naciones Unidas con un Arduino Nano y el acelerómetro ADXL345 [En Español] [Ecuador]](https://foto.askix.com/thumb/170x110/9/ea/9ea02f8bd01a84c7d80e10854556ffde.jpg)
