Paso 7: Crear una página HTML para controlar la cámara
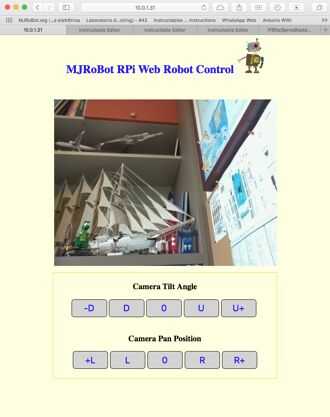
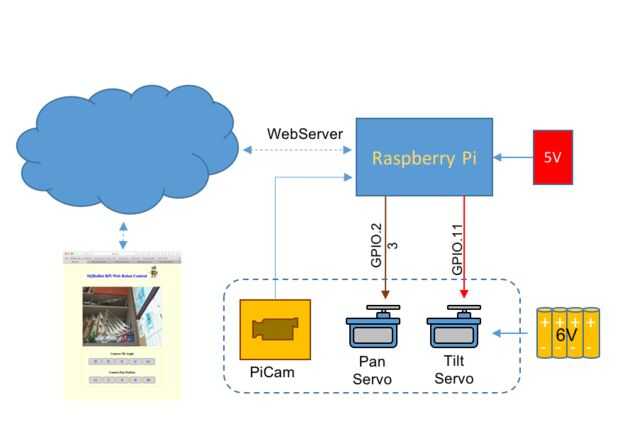
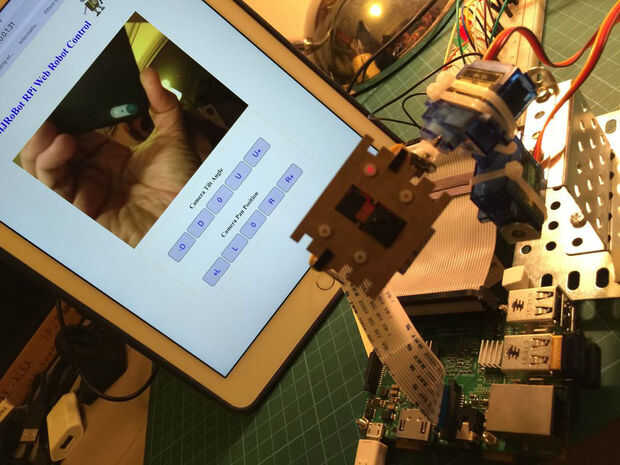
Vamos a usar el index.html que creamos en el paso pasado, incluye 10 botones que llaman a funciones para ejecutar los scripts creados en el último paso (véase la página final).
Por ejemplo, vamos a crear un botón para colocar la cámara en su posición central de la inclinación:
<xmp> button { color: blue; background:lightgrey; border: 1px solid #000; border-radius: 8px; position: center; } ... <button style="height: 50px; width: 100px; font-size: 25px" onclick="centertilt()">0</button> ... </xmp> El código HTML anterior creará un botón redondeado con un "0" en él (véase la página final).
Cuando se presiona el botón, por el comando "onclick=centertilt()", la función de "se llama centertilt():
<xmp> function centertilt() { xmlhttp.open("GET","cgi-bin/centertilt.cgi",true); xmlhttp.send(); }</xmp> Y una vez que se llama la función centertilt(), la centertilt.cgi de secuencia de comandos se ejecuta y el servo se moverá a la posición central.
El mismo procedimiento debe usarse para todos los botones. Hay algunas funciones HTML que se organizar la mirada y relleno que se puede realizar buscando la página HTML completa. La fuente HTML puede ser visto abajo:
<xmp> <html> <head> </head> <style> body {background-color: lightyellow} h1 {color:blue} button { color: blue; background:lightgrey; border: 1px solid #000; border-radius: 8px; position: center; } </style> <body> <div style="text-align:center"> <h1> MJRoBot RPi Web Robot Control <img style="height: 100px"src="/images/robot52.png"> </h1> <br><br> <iframe src="http://10.0.1.31:9000/javascript_simple.html" frameborder="0" align="middle" width="640" heigh$ <br><br> <span style="display:inline-block;padding:5px;border:1px solid #fc0; font-size: 140%;font-weight: bold;"> <p>Camera Tilt Angle</p> <img hspace="18" style="padding-left: 5px"> <button style="height: 50px; width: 100px; font-size: 25px" onclick="downtilt()">-D</button> <button style="height: 50px; width: 100px; font-size: 25px" onclick="downcentertilt()">D</button> <button style="height: 50px; width: 100px; font-size: 25px" onclick="centertilt()">0</button> <button style="height: 50px; width: 100px; font-size: 25px" onclick="upcentertilt()">U</button> <button style="height: 50px; width: 100px; font-size: 25px" onclick="uptilt()">U+</button> <img hspace="18" style="padding-left: 5px"> <br><br> <p>Camera Pan Position</p> <button style="height: 50px; width: 100px; font-size: 25px" onclick="leftpan()">+L</button> <button style="height: 50px; width: 100px; font-size: 25px" onclick="leftCenterPan()">L</button> <button style="height: 50px; width: 100px; font-size: 25px" onclick="centerpan()">0</button> <button style="height: 50px; width: 100px; font-size: 25px" onclick="rightCenterPan()">R</button> <button style="height: 50px; width: 100px; font-size: 25px" onclick="rightpan()">R+</button> <p></p> </span> <script> var xmlhttp; xmlhttp=new XMLHttpRequest(); function downtilt() { xmlhttp.open("GET","cgi-bin/downtilt.cgi",true); xmlhttp.send(); } function downcentertilt() { xmlhttp.open("GET","cgi-bin/downcentertilt.cgi",true); xmlhttp.send(); }function centertilt() { xmlhttp.open("GET","cgi-bin/centertilt.cgi",true); xmlhttp.send(); } function upcentertilt() { xmlhttp.open("GET","cgi-bin/upcentertilt.cgi",true); xmlhttp.send(); } function uptilt() { xmlhttp.open("GET","cgi-bin/uptilt.cgi",true); xmlhttp.send(); } function leftpan() { xmlhttp.open("GET","cgi-bin/leftpan.cgi",true); xmlhttp.send(); } function leftCenterPan() { xmlhttp.open("GET","cgi-bin/leftCenterPan.cgi",true); xmlhttp.send(); } function centerpan() { xmlhttp.open("GET","cgi-bin/centerpan.cgi",true); xmlhttp.send(); }function rightCenterPan() { xmlhttp.open("GET","cgi-bin/rightCenterPan.cgi",true); xmlhttp.send(); } function rightpan() { xmlhttp.open("GET","cgi-bin/rightpan.cgi",true); xmlhttp.send(); } </script> </body> </html> </xmp>
