Paso 7: Cómo enviar correo electrónico de google de Arduino a través TEMBOO
Enviar correo electrónico de google de arduino a través TEMBOO que tenemos que hacer algo primero.
[Necesitan cuenta de Google]
- Hacer cuenta de google. [Cuenta de Google de hacer]
- Necesita una contraseña de la aplicación específica google que genera después de la verificación de 2 pasos. [Configuración de la contraseña de Google App específica]
[Cómo usar TEMBOO]
- Descargar biblioteca TEMBOO adjuntas e instalar como biblioteca IRLED/Twitter al directorio de tu Arduino instalado
- Hacer cuenta TEMBOO primera [TEMBOO cuenta]
- Existen muchas APIs ya preparadas por TEMBOO. Vamos a utilizar API "enviar correo electrónico de google" en este proyecto, así que tenemos que ir [Google > Gmail > SendEmail]
- [Importante] Y tienes que seleccionar "modo de IoT [ON]" que se encuentra en la parte superior derecha con el personaje amarillo.
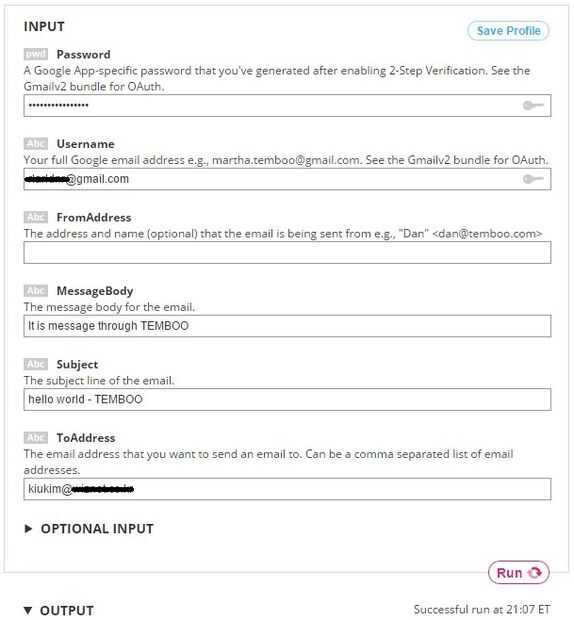
- Prueba de enviar correo electrónico con caja rosa ingrese y haga clic en ejecutar. (Ver imagen)
- Podemos ver el Arduino sketch código fuente para enviar gmail desde TEMBOO como abajo
- Ahora podemos utilizar TEMBOO para enviar gmail
[Esbozo de código fuente]
/* Setup shield-specific #include statements */#include <SPI.h> #include <Dhcp.h> #include <Dns.h> #include <Ethernet.h> #include <EthernetClient.h> #include <Temboo.h> #include "TembooAccount.h" // Contains Temboo account informationbyte ethernetMACAddress[] = ETHERNET_SHIELD_MAC; EthernetClient client; int numRuns = 1; // Execution count, so this doesn't run forever int maxRuns = 10; // Maximum number of times the Choreo should be executedvoid setup() { Serial.begin(9600); // For debugging, wait until the serial console is connected. delay(4000); while(!Serial); Serial.print("DHCP:"); if (Ethernet.begin(ethernetMACAddress) == 0) { Serial.println("FAIL"); while(true); } Serial.println("OK"); delay(5000); Serial.println("Setup complete.\n"); } void loop() { if (numRuns <= maxRuns) { Serial.println("Running SendEmail - Run #" + String(numRuns++)); TembooChoreo SendEmailChoreo(client); // Invoke the Temboo client SendEmailChoreo.begin(); // Set Temboo account credentials SendEmailChoreo.setAccountName(TEMBOO_ACCOUNT); SendEmailChoreo.setAppKeyName(TEMBOO_APP_KEY_NAME); SendEmailChoreo.setAppKey(TEMBOO_APP_KEY); // Set Choreo inputs String MessageBodyValue = "Message what you want to send"; SendEmailChoreo.addInput("MessageBody", MessageBodyValue); String SubjectValue = "subject of email"; SendEmailChoreo.addInput("Subject", SubjectValue); String PasswordValue = "generated_password"; SendEmailChoreo.addInput("Password", PasswordValue); String UsernameValue = "youraccount"; SendEmailChoreo.addInput("Username", UsernameValue); String ToAddressValue = "destination_address SendEmailChoreo.addInput("ToAddress", ToAddressValue); // Identify the Choreo to run SendEmailChoreo.setChoreo("/Library/Google/Gmail/SendEmail"); // Run the Choreo; when results are available, print them to serial SendEmailChoreo.run(); while(SendEmailChoreo.available()) { char c = SendEmailChoreo.read(); Serial.print(c); } SendEmailChoreo.close(); } Serial.println("\nWaiting...\n"); delay(30000); // wait 30 seconds between SendEmail calls } ["TembooAccount.h", archivo de encabezado]
/*IMPORTANT NOTE about TembooAccount.h TembooAccount.h contains your Temboo account information and must be included alongside your sketch. To do so, make a new tab in Arduino, call it TembooAccount.h, and copy this content into it. */ #define TEMBOO_ACCOUNT "your_temboo_account" // Your Temboo account name #define TEMBOO_APP_KEY_NAME "myFirstApp" // Your Temboo app key name #define TEMBOO_APP_KEY "1eb4e************************39a61" // Your Temboo app key #define ETHERNET_SHIELD_MAC {} /* The same TembooAccount.h file settings can be used for all Temboo SDK sketches. Keeping your account information in a separate file means you can share the main .ino file without worrying that you forgot to delete your credentials. */

![Añadir Bluetooth 4.0 para su proyecto de Arduino [Internet] - controlada por Smartphone Añadir Bluetooth 4.0 para su proyecto de Arduino [Internet] - controlada por Smartphone](https://foto.askix.com/thumb/170x110/f/c7/fc78354fbccfdfa24c7ce38d848de24c.jpg)


