Paso 5: El código de CONTROL de temporizador
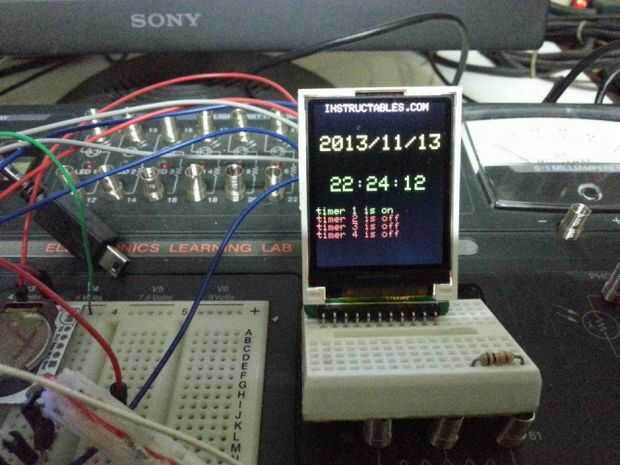
Este esquema utiliza la RTC para controlar 4 relés en cualquier intervalo de tiempo o ciclo desea.
copiar el bosquejo abajo y péguela en el IDE de Arduino verificar y ejecutar el programa.
Este dibujo fue creado usando código de adafruit y RTC-bibliotecas
CONEXIONES RTC
Conecte el VCC RTC al Arduino + 5 v
TIERRA de RTC a la GND de Arduino
SDA de RTC con el conector analógico Arduino 4
SCL de RTC con el conector analógico Arduino 5
CONEXIÓN DE PANTALLA LCD
#define sclk 4 //connected al PIN digital 4
#define mosi 5 //connected para PIN digital 5
#define cs 6 //connected para PIN digital 6
#define dc 7 //connected al PIN digital 7
#define rst 8 //connected a digital 8 PIN
CONEXIÓN DE RELÉ
Toma de tierra conectada a GND de Arduino
int Pin1 = 9; 1 conectado a digital 9
int Pin2 = 10; In2 conectado a 10 digital
int Pin3 = 11; IN3 conectado a digital 11
int Pin4 = 12; In4 conectado a digital 12
VCC conectado a Arduino + 5v
#include / / librería gráfica de base
#include / / específicos de hardware de biblioteca
#include / / biblioteca necesaria para RTC
#include / / biblioteca necesaria para RTC
#include "RTClib.h" //RTC biblioteca
RTC_DS1307 RTC;
Tft de Adafruit_ST7735 = Adafruit_ST7735 (cs, dc, mosi, sclk, rst);
void setup(void) {}
DEFINICIÓN DE PINES PARA CONTROL DE RELÉ DE
pinMode (PIN 1, salida);
pinMode (Pin2, salida);
pinMode (Pin3, salida);
pinMode (Pin4, salida);
Wire.Begin();
RTC.begin();
tft.initR(INITR_BLACKTAB); inicializar una ficha de chip, negro ST7735S
tft.fillScreen(ST7735_BLACK); Limpiar la pantalla
digitalWrite (PIN 1, 1);
digitalWrite (Pin2, 1);
digitalWrite (Pin3, 1);
digitalWrite (Pin4, 1);
tft.setCursor(0,50);
TFT.println ("esperando 10 segundos");
TFT.println ("de RTC a Sync");
retardo (10000); //wait para RTC para responder, si no tiempo
tft.fillScreen(ST7735_BLACK); Limpiar la pantalla
if (!. {RTC.isrunning())}
TFT.println ("¡ RTC no está funcionando!");
TFT.println ("reajuste RTC");
línea establece el RTC en la fecha y hora que este sketch fue compilado
RTC.adjust (DateTime (__DATE__, __TIME__));
tft.fillScreen(ST7735_BLACK); Limpiar la pantalla
}
}
void loop() {}
tft.setCursor(10,10);
tft.setTextColor(ST7735_WHITE);
tft.setTextSize(1);
TFT.println ("temporizador");
tft.setTextColor (ST7735_YELLOW, ST7735_BLACK); //set texto color y tamaño para la fecha de TinyRTC
tft.setTextSize(2);
tft.setCursor(5,30);
Fecha y hora = ahora RTC.now(); COGE LA FECHA Y LA HORA DEL RTC
TFT.Print(Now.Year(), DEC);
TFT.Print('/');
TFT.Print(Now.month(), DEC);
TFT.Print('/');
TFT.Print(Now.Day(), DEC);
TFT.println(' ');
tft.setCursor(15,70);
tft.setTextColor(ST7735_GREEN,ST7735_BLACK); Set color por vez
tft.setTextSize (2); //set texto tamaño para tiempo de TinyRTC
TFT.Print(Now.hour(), DEC);
TFT.Print(':');
if(Now.minute() < 10) {//PRINT un 0 delante si menos de 10 minutos
TFT.Print('0');
TFT.Print(Now.minute(), DEC);
}
Else {}
TFT.Print(Now.minute(), DEC);
}
TFT.Print(':');
if(Now.Second() < 10) {//PRINT A 0 frente a los segundos si menos de 10
TFT.Print('0');
TFT.Print(Now.Second(), DEC);
}
Else {}
TFT.Print(Now.Second(), DEC);
}
TFT.println("");
ESTA ES LA DECISIÓN QUE HACE PARTE DEL ESBOZO, ESTE EJEMPLO ES UN CICLO DE UN MINUTO
PARA FINES DE DEMOSTRACIÓN: TI ENCIENDE EL RELÉ 1 EN 10 SEGUNDOS, LUEGO DE A 20
ENTONCES VUELTAS RELÉ 2 Y 4 EN 40 SEGUNDOS Y APAGADO EN 50,
EN 50 SEGUNDOS ENCIENDE RELÉ 1 Y 3 ENTONCES APAGADO EN 0
if(Now.Second() == 10) {}
tft.setCursor(0,100);
tft.setTextColor(ST7735_GREEN,ST7735_BLACK); establecer color para tiempo ON
tft.setTextSize (1); //set tamaño del texto
TFT.Print ("1 relé está en");
digitalWrite (PIN 1, 0);
}
if(Now.Second() == 20) {}
tft.setCursor(0,100);
tft.setTextColor(ST7735_RED,ST7735_BLACK); establecer color para tiempo ON
tft.setTextSize (1); //set tamaño del texto
TFT.Print ("relé 1 está apagado");
digitalWrite (PIN 1, 1);
}
if(Now.Second() == 40) {}
digitalWrite (PIN 1, bajo);
digitalWrite (Pin2, alto);
digitalWrite (Pin3, LOW);
digitalWrite (Pin4, alto);
tft.setCursor(0,100);
tft.setTextColor(ST7735_RED,ST7735_BLACK); establecer color para tiempo ON
tft.setTextSize (1); //set tamaño del texto
tft.setTextColor(ST7735_GREEN,ST7735_BLACK);
TFT.println ("1 relé está en");
tft.setTextColor(ST7735_RED,ST7735_BLACK);
TFT.println ("relé 2 está apagado");
tft.setTextColor(ST7735_GREEN,ST7735_BLACK);
TFT.println ("relé 3 es en");
tft.setTextColor(ST7735_RED,ST7735_BLACK);
TFT.println («4 relé está apagado");
}
if(Now.Second() == 50) {}
digitalWrite (PIN 1, elevado);
digitalWrite (Pin2, LOW);
digitalWrite (Pin3, alto);
digitalWrite (Pin4, LOW);
tft.setCursor(0,100);
tft.setTextColor(ST7735_RED,ST7735_BLACK); establecer color para tiempo ON
tft.setTextSize (1); //set tamaño del texto
TFT.println ("relé 1 está apagado");
tft.setTextColor(ST7735_GREEN,ST7735_BLACK);
TFT.println ("relé 2 está en");
tft.setTextColor(ST7735_RED,ST7735_BLACK);
TFT.println ("Relais 3 está apagado");
tft.setTextColor(ST7735_GREEN,ST7735_BLACK);
TFT.println ("relé 4 es en");
}
if(Now.Second() == 00) {}
digitalWrite (PIN 1, elevado);
digitalWrite (Pin2, alto);
digitalWrite (Pin3, alto);
digitalWrite (Pin4, alto);
tft.setCursor(0,100);
tft.setTextColor(ST7735_RED,ST7735_BLACK); establecer color para tiempo ON
tft.setTextSize (1); //set tamaño del texto
TFT.println ("relé 1 está apagado");
TFT.println ("relé 2 está apagado");
TFT.println ("Relais 3 está apagado");
TFT.println («4 relé está apagado");
}
}


