Paso 2: código
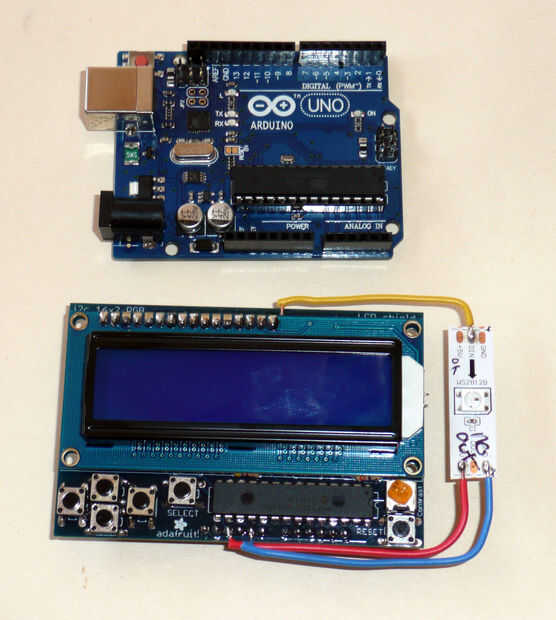
- Botón: Reducir el color seleccionado (R, G o B) por el tamaño de paso actual
- Botón: Aumentar el color seleccionado (R, G o B) por el tamaño de paso actual
- Botón izquierdo: mover el color anterior
- Botón derecho: mover al siguiente color
- Botón SELECT: cambiar el tamaño de paso de 1 a 5 a 10 a 20 a 50, luego de nuevo a 1...
El código utiliza las bibliotecas de Adafruit protector de pantalla LCD y Neopixel. El código de ejemplo está por debajo.
También podría agregar un conector y una cadena completa con este enfoque de la energía.
El código que usé:
//*********************// RGB_LCD - use the Adafruit LCD shield to set the RGB values on a single WS2812b LED// Based on the Adafruit Neopixel and LCD Shield Libraries and examples// December, 2013 Carl Sutter//*********************// LCD Shield Library#include <Wire.h>#include <Adafruit_MCP23017.h>#include <Adafruit_RGBLCDShield.h>// The shield uses the I2C SCL and SDA pins. On classic Arduinos// this is Analog 4 and 5 so you can't use those for analogRead() anymore// However, you can connect other I2C sensors to the I2C bus and share// the I2C bus. Adafruit_RGBLCDShield lcd = Adafruit_RGBLCDShield(); // Neopixel Library#include <Adafruit_NeoPixel.h>#define PIN 6// Parameter 1 = number of pixels in strip// Parameter 2 = pin number (most are valid)// Parameter 3 = pixel type flags, add together as needed:// NEO_KHZ800 800 KHz bitstream (most NeoPixel products w/WS2812 LEDs)// NEO_KHZ400 400 KHz (classic 'v1' (not v2) FLORA pixels, WS2811 drivers)// NEO_GRB Pixels are wired for GRB bitstream (most NeoPixel products)// NEO_RGB Pixels are wired for RGB bitstream (v1 FLORA pixels, not v2) Adafruit_NeoPixel strip = Adafruit_NeoPixel(1, PIN, NEO_GRB + NEO_KHZ800); // These #defines make it easy to set the backlight color - use if you have an RGB shield//#define RED 0x1//#define YELLOW 0x3//#define GREEN 0x2//#define TEAL 0x6//#define BLUE 0x4//#define VIOLET 0x5#define WHITE 0x7#define ARROW 0x7E#define LARROW 0x7F#define DELAY_QUICK 40 // the shortes delay between presses so you can scroll quickly, but still get to a specific button press / value#define DELAY_SLOW 100 // slower delay for buttons thatare changing modes etc.uint8_t curCols[] = {127, 127, 127}; // array of current RGB valuesuint8_t curCol =0; // index of the current color being worked on - 0=R, 1-G, 2=Buint8_t step_size =1; // the amount to move in each button pressvoidsetup() { lcd.begin(16, 2); strip.begin(); strip.show(); // Initialize all pixels to 'off' lcd.setBacklight(WHITE); // leave the "Step Size:" label on the display so it does not flicker lcd.setCursor(2,1); lcd.print("Step Size: "); // display the startup data display(); } // display - print the RGB values and set the LEDvoiddisplay() { uint8_t i; strip.setPixelColor(0, curCols[0], curCols[1], curCols[2]); strip.show(); lcd.setCursor(0,0); for (i=0; i<3; i++) { if (curCol == i) { lcd.print(char('*')); } else { lcd.print(' '); } if (i ==0) lcd.print('R'); if (i ==1) lcd.print('G'); if (i ==2) lcd.print('B'); if (curCols[i]<100) lcd.print(' '); if (curCols[i]<10) lcd.print(' '); lcd.print(curCols[i]); } //lcd.setCursor(2,1);//lcd.print("Step Size: "); lcd.setCursor(13,1); lcd.print(step_size); lcd.print(' '); // hack to have one digit #s print over old 2 digit #s } // print_valvoidloop() { uint8_t buttons = lcd.readButtons(); if (buttons) { if (buttons & BUTTON_UP) { curCols[curCol] += step_size; display(); delay(DELAY_QUICK); } if (buttons & BUTTON_DOWN) { curCols[curCol] -= step_size; display(); delay(DELAY_QUICK); } if (buttons & BUTTON_LEFT) { if (curCol ==0) { curCol =2; } else { curCol--; } display(); delay(DELAY_SLOW); } if (buttons & BUTTON_RIGHT) { if (curCol ==2) { curCol =0; } else { curCol++; } display(); delay(DELAY_SLOW); } if (buttons & BUTTON_SELECT) { switch (step_size) { case1: step_size =5; break; case5: step_size =10; break; case10: step_size =20; break; case20: step_size =50; break; default: step_size =1; } display(); delay(DELAY_SLOW); } } // buttons != 0 } // loop
