Paso 4: Escribir el código


En primer lugar, he leído la de MediaTek LinkIt una guía del desarrollador de, en particular, la sección recibir mensajes SMS, así como la API. Adjunto a la guía aquí en caso de link deja de funcionar.
He adjuntado mi código completo aquí, que sólo debería funcionar. Específicamente lo rompió en funciones que deberían ser fáciles de entender, voy a ir a través de cada uno de ellos aquí. Por favor lea los comentarios en línea para información adicional.
Inicializar las Variables globales
#include <LGSM.h> //these variables are used for the LED int ledGreenPin = 13; //I am using the onboard LED as an indicator boolean ledGreenState = LOW; //this is the pin that is connected to the transistor base (via a resistor) int triggerPin = 12; //these variables are for the sms char smsContent[200]; int smsLength = 0; char smsSender[20]; //these variables are for the password const int passwordLength = 20; //number of possible characters in password, remember the null terminator const char password[passwordLength] = "mellon"; //this is the actual password
función Setup()
La función de configuración se ejecuta una vez después de que el dispositivo se inicia. El pin que controla el onboard led (D13) y la clavija conectada a la base del transistor (D12) son inicializada como salidas y establecen en valores predeterminados de 0 ('LOW').
El puerto serie está inicializado a una velocidad en baudios de 9600, por lo que información de depuración puede imprimirse.
La función waitForSim() se llama una vez (se describe más adelante)
void setup() { //this code runs once at setup pinMode(ledGreenPin, OUTPUT); //initialise LED pinMode(triggerPin, OUTPUT); //initialise PIN digitalWrite(ledGreenPin, ledGreenState); //turn LED off digitalWrite(triggerPin, LOW); //make sure trigger is off (assuming NPN transistor on a pullup input) Serial.begin(9600); //start the serial port waitForSim(); //wait for simcard to be active } función waitForSim()
La función de waitForSim() simplemente se sienta en un bucle, comprobando cada medio segundo, definido por delay(500), si la tarjeta SIM está lista. El LED verde se apaga en/cada cheque que parpadea y luego en una vez la SIM queda listo.
void waitForSim() { //this is just a function to wait until the SIM is ready Serial.print("waiting for sim"); while (!LSMS.ready()) { delay(500); ledGreenState = !ledGreenState; //blink the led digitalWrite(ledGreenPin, ledGreenState); Serial.print('.'); } ledGreenState = HIGH; //turn led on once SIM is ready digitalWrite(ledGreenPin, ledGreenState); Serial.println("Sim Ready"); } función receiveSms()
Esta función comprobará si hay un nuevo SMS. Si lo hay, es leer en un carácter a la vez y almacenado en el buffer de smsContent. Si no hay ningún SMS nuevo entonces la función devuelve false. Esto nos permite llamar tantas veces como nos gusta en el bucle principal.
Una vez que el SMS ha sido leído se elimina con la orden flush().
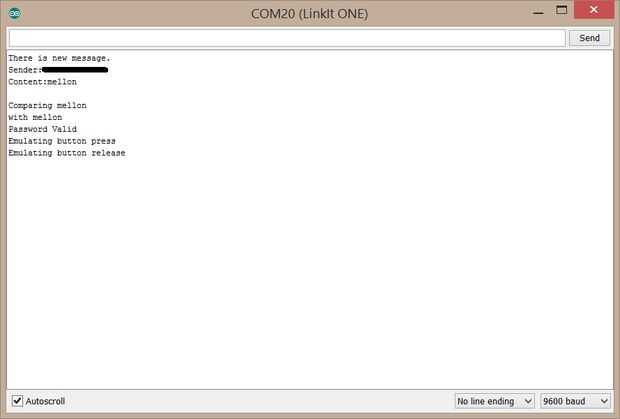
boolean receiveSMS() { //this function will store a new sms in the buffers //or return false if there is no new sms int v; if (LSMS.available()) // Check if there is new SMS { Serial.println("There is new message."); LSMS.remoteNumber(smsSender, 20); // store sender in buffer smsLength = 0; //storing a new sms while (true) { v = LSMS.read(); if (v < 0) break; smsContent[smsLength] = v; smsLength++; } smsContent[smsLength] = '\0'; smsLength++; LSMS.flush(); // delete message return HIGH; } else { return LOW; } } función displaySMS()
Esta función imprime sólo el remitente y el contenido búferes para el puerto serie, que es útil para la depuración.
void displaySMS() { Serial.print("Sender:"); Serial.println(smsSender); Serial.print("Content:"); Serial.println(smsContent); Serial.println(); } función validatePassword()
Esta función se utiliza para comparar el contenido de los SMS con la cadena de contraseña. Si el contenido coincide con la cadena, entonces la función devuelve 1 (alto), de lo contrario devuelve 0 (bajo).
boolean validatePassword() { //this function will return true if the contents of the sms start with the defined password Serial.print("Comparing "); Serial.println(password); Serial.print("with "); Serial.println(smsContent ); if (strcmp(password, smsContent) == 0) { Serial.println("Password Valid"); return HIGH; } else { Serial.println("Password Invalid"); return LOW; } } función triggerRemote()
Función que esta función simplemente ajusta el perno de D12 (base del transistor) alto durante un período determinado de tiempo (1 segundo funcionado para mí, remoto usted puede preferir algo diferente)
void triggerRemote() { //this function will "turn on" the transistor that emulates a button press Serial.println("Emulating button press"); digitalWrite(triggerPin, HIGH); delay(1000); digitalWrite(triggerPin, LOW); Serial.println("Emulating button release"); } función loop()
Esta función es la base de un programa de Arduino y sólo se ejecuta una y otra vez para toda la eternidad. Puesto que todo ya se ha analizado en las funciones es totalmente autoexplicativa.
void loop() { if (receiveSMS()) { displaySMS(); if (validatePassword()) { triggerRemote(); } } delay(1000); }


