Paso 5: La aplicación para Smartphone
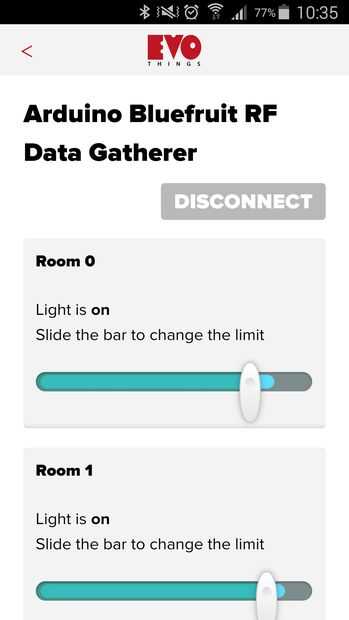
Última parte del proyecto!
Como siempre empezamos con las bibliotecas se necesita. El cordova.js, evothings.js y ui.js se incluyen automáticamente cuando se crea un nuevo proyecto en el Banco de trabajo Evothings. Las bibliotecas jquery.js no es obligatorio, puede modificar el código para que lo no necesario, pero facilita las cosas.
Para la comunicación de BLE utilizamos easyble.js, que se basa en el plugin de ble de Córdoba (com.evothings.ble, que deberá incluir si usted quiere construir la aplicación) y también requiere la biblioteca util.js .
Para definir los límites, vamos a utilizar un control deslizante. Utilicé la biblioteca rangeSlider.js , descargable aquí, para que se vea más bonito.
<script src="cordova.js"></script> <script src="libs/jquery/jquery.js"></script> <script src="libs/evothings/evothings.js"></script> <script src="libs/evothings/util/util.js"></script> <script src="libs/evothings/ui/ui.js"></script> <script src="libs/evothings/easyble/easyble.js"></script> <script src="libs/rangeSlider/rangeSlider.js"></script>
Vamos entonces a crear algunos objetos. La primera de ellas, la aplicación, contiene variables y funciones de nuestra aplicación. El segundo de ellos, BluefruitUART, contendrá el objeto de Bluefruit una vez nos hemos encontrado después de la exploración. El objeto de BLEDevice tendrá información necesaria para comunicarse con la Junta de Bluefruit.
var app = {}; // Object holding the functions and variables var BluefruitUART = {}; // Object holding the BLE device var BLEDevice = {}; // Object holding Bluefruit BLE device information A continuación rellenamos el objeto BLEDevice con la información. La propiedad de nombre contiene la cadena que se transmite por el chip de Bluefruit y puede utilizarse para identificarlo. Las propiedades readCharacteristicUUID , writeCharacteristicUUID y servicioscontiene los UUID que son específicos para el chip de Bluefruit. El primero de ellos se utiliza para leer los servicios desde el chip y tener acceso a ellos, el otro para enviar datos al chip y la tercera para recibir datos.
BLEDevice.name = 'Adafruit Bluefruit LE'; // Bluefruit name BLEDevice.services = ['6e400001-b5a3-f393-e0a9-e50e24dcca9e']; // Bluefruit services UUID BLEDevice.writeCharacteristicUUID = '6e400002-b5a3-f393-e0a9-e50e24dcca9e'; // Bluefruit writeCharacteristic UUID BLEDevice.readCharacteristicUUID = '6e400003-b5a3-f393-e0a9-e50e24dcca9e'; // Bluefruit readCharacteristic UUID
Ahora estamos llenando el objeto app con variables globales del código. La propiedad de valores guardará los valores recibidos de la "madre" Arduino y mensaje almacenará los datos en bruto. nbRooms contiene el número total de habitaciones y msgLength la longitud del mensaje que será recibido.
app.values = []; // For storing received values app.message = ""; // For storing received data app.nbRooms = 3; // Total number of rooms app.msgLength = 4 * app.nbRooms + 1; // Length of message received from transmitter Arduino
La función principal es llamada una vez que el dispositivo está listo. Añade eventos a los botones de conectar y desconectar . El primero de ellos se conecta al chip Bluefruit, lee sus servicios, permite las notificaciones y luego envía los límites a la "madre" Arduino.
function main() { // Main function called when the device is ready var connect = document.getElementById('connect'); connect.addEventListener('click', function() { connect.innerHTML = 'Connecting'; app.connectToBluefruit(function() // Connect to Bluefruit device { app.readServices(function() // Read services from Bluefruit device { app.enableNotifications(app.sendLimits); // Enable notifications from Bluefruit device and send stored limits $('#connect').hide(); $('#disconnect').show(); connect.innerHTML = 'Connect'; } ); } ); } ); var disconnect = document.getElementById('disconnect'); disconnect.addEventListener('click', function() { app.disconnect(); // Disconnect from Bluefruit device $('#roomList').empty(); $('#disconnect').hide(); $('#connect').show(); } ); } Una vez que el dispositivo está listo, se llama a la función principal .
document.addEventListener('deviceready', main, false); // Wait for the device to be ready before executing code Pasamos ahora a las funciones. La primera de ellas, connectToBluefruit busca dispositivos BLE y deje de una vez que encuentre el uno con el uno con el nombre correcto. Luego guarda el dispositivo en el objeto BluefruitUART y uno de sus métodos se utiliza para conectarse a ella. Una vez establecida la conexión, llama a otra función pasada como un parámetro, que es readServices.
app.connectToBluefruit = function(callback) // Connect to Bluefruit device { evothings.easyble.startScan // Start scanning ( function(device) { if (device.name == BLEDevice.name) // If device name correspond to Bluefruit device name { evothings.easyble.stopScan(); // Stop the scan BluefruitUART = device; // Store the Bluefruit device console.log('Adafruit Bluefruit LE UART found !'); BluefruitUART.connect // Connect to Bluefruit device ( function(device) { console.log('Connected to BLE device ' + BluefruitUART.name); callback(); }, function(errorCode) { console.log('Failed to connect to BLE device: ' + errorCode); } ) } }, function(errorString) { console.log('Error while scanning: ' + errorString); } ); }; La función de desconexión utiliza el método de cierre del objeto BluefruitUART para desconectar el dispositivo de Bluefruit.
app.disconnect = function() // Disconnect from Bluefruit device { BluefruitUART.close(); console.log('Disconnected from BLE device ' + BluefruitUART.name); }; La función de readServices Lee los servicios del dispositivo aplicables una vez que se ha establecido la conexión. Utiliza los servicios UUID que lo especificados anteriormente.
app.readServices = function(callback) // Read services from Bluefruit device { BluefruitUART.readServices ( BLEDevice.services, function(device) { console.log('BLE services available for device ' + BluefruitUART.name); callback(); }, function(errorString) { console.log('BLE services error: ' + errorString); } ) }; La función sendMessage envía los datos al chip de Bluefruit. Utiliza el writeCharacteristic UUID que lo especificados anteriormente.
app.sendMessage = function(message) // Send a message to Bluefruit device { var data = evothings.ble.toUtf8(message); BluefruitUART.writeCharacteristic ( BLEDevice.writeCharacteristicUUID, data, function() { console.log('Sent: ' + message); }, function(errorString) { console.log('BLE writeCharacteristic error: ' + errorString); } ) }; La función enableNotifications se utiliza para recibir datos desde el chip de Bluefruit para el Smartphone. La primera cosa a hacer es escribir el descriptor para poder activar las notificaciones cuando cambia. El método writeDescriptor del objeto BluefruitUART toma varios parámetros. El primero es el readCharacteristicUUID que hemos especificados anteriormente. El segundo es el descriptor de UUID, que es el mismo para todos los dispositivos aplicables. La tercera es el contenedor de los datos que se leerán desde el chip de Bluefruit.
Una vez que el descriptor está escrito, tenemos que activar las notificaciones que llamarán a una función cada vez que los datos leídos de los cambios de descriptor. Esto se hace utilizando el método enableNotification del objeto BluefruitUART , que readCharacteristicUUID. Luego viene la función que se llama cuando cambian los datos. Analiza el mensaje y guarda los valores. El análisis puede parecer un poco complicado y complejo, pero quería tomar precauciones para asegurarse de que no hay datos se pierde.
Una vez que se guardan los valores, se llama la función fillRoomList , que llama a la función setupSlider que trataremos a continuación.
app.enableNotifications = function() // Enable notifications for Bluefruit device { BluefruitUART.writeDescriptor // Write descriptor for Bluefruit device ( BLEDevice.readCharacteristicUUID, '00002902-0000-1000-8000-00805f9b34fb', // Same for every BLE device new Uint8Array([1]), function() { console.log('BLE descriptor written.'); }, function(errorString) { console.log('BLE writeDescriptor error: ' + errorString); } ); BluefruitUART.enableNotification // Enable notifications for Bluefruit device ( BLEDevice.readCharacteristicUUID, function(data) { var message = evothings.ble.fromUtf8(data); // Message received from transmitter Arduino /* This part handles the parsing of the received message (message). It will then be stored in (app.message). Due to the way Bluetooth works, the message will sometimes be sent in two parts, therefore I wrote a code that will concatenate the two parts if it happens. */ // If for some reason the stored message is longer than the max length (app.msgLength), empty it if (app.message.length > app.msgLength) { app.message = ""; } // If both the message and the stored message are shorter than expected if (app.message.length < app.msgLength && message.length < app.msgLength) { /* If the received message contains a '#' (message.indexOf('#') != -1), it means that it is the first part of the message, so the stored message has to be empty (app.message.length == 0). If the received message contains a '*' (message.indexOf('*') != -1), it means that it is the second part of the message, so the stored message can't be empty (app.message.length > 0). */ if ((message.indexOf('#') != -1 && app.message.length == 0) || (message.indexOf('*') != -1 && app.message.length > 0)) { app.message = app.message.concat(message); // Concatenate the received message to the stored message } } /* If the received message is as long as it should be (message.length == app.msgLength), it starts with a '#' (message.indexOf('#') == 0) and ends with a '*' (message.indexOf('*') == app.msgLength - 1), then it is complete and can be stored in (app.message) */ else if (message.length == app.msgLength && message.indexOf('#') == 0 && message.indexOf('*') == app.msgLength - 1) { app.message = message; } /* If the stored message is as long as it should be (app.message.length == app.msgLength), it starts with a '#' (app.message.indexOf('#') == 0) and ends with a '*' (app.message.indexOf('*') == app.msgLength - 1), then it is complete */ if (app.message.length == app.msgLength && app.message.indexOf('#') == 0 && app.message.indexOf('*') == app.msgLength - 1) { var end = app.message.indexOf('*'); // Get the position of the last char // Create an array (split("/")) from the message and store the values in (app.values) app.values = app.message.substring(1, end).split("/"); app.message = ""; // Empty the message console.log('--------------------------------------'); console.log("Data for room:"); for (var i = 0; i < app.values.length; i++) { app.values[i] = parseInt(app.values[i]); // Convert the values from string to int console.log(" * " + i + " is " + app.values[i]); } } app.fillRoomList(app.setupSlider); // Fill the list with the values that were stored and then configure the slider }, function(errorString) { console.log('BLE enableNotification error: ' + errorString); } ); La función de setupSlider configura los controles deslizantes. Cuando se desplaza un cursor, el límite cambia y se almacena en el localStorage de la función activada el evento onSlide . Los límites son enviados a la "madre" Arduino usando la función sendLimits .
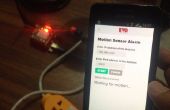
app.setupSlider = function() // Slide bar configuration { var slider = document.querySelectorAll('input[type="range"]'); rangeSlider.create(slider, { polyfill: true, // Boolean, if true, custom markup will be created rangeClass: 'rangeSlider', disabledClass: 'rangeSlider--disabled', fillClass: 'rangeSlider__fill', bufferClass: 'rangeSlider__buffer', handleClass: 'rangeSlider__handle', startEvent: ['mousedown', 'touchstart', 'pointerdown'], moveEvent: ['mousemove', 'touchmove', 'pointermove'], endEvent: ['mouseup', 'touchend', 'pointerup'], min: null, // Number , 0 max: null, // Number, 100 step: null, // Number, 1 value: null, // Number, center of slider buffer: null, // Number, in percent, 0 by default borderRadius: 10, // Number, if you use buffer + border-radius in css for looks good, onInit: function () { console.info('onInit') }, onSlideStart: function (position, value) { }, onSlide: function (position) { // When the slide bar is moved for (var i = 0; i < app.values.length; i++) { var slideBarValue = document.getElementById("slideBar" + i).value; if (slideBarValue == position) // If the value corresponds to the position of one of the slideBars { localStorage.setItem('limit' + i, position); // Store new limit } } app.sendLimits(); // Send limits to the transmitter Arduino (for lighting up the LEDs) }, onSlideEnd: function (position, value) { } }); }; Como probablemente recordarán, se llama a la función de fillRoomList una vez que los datos ha sido analizados desde el mensaje recibido de la "madre" Arduino. Muestra el estado de la luz y un control deslizante para cada habitación. Un elemento HTML se crea y se agrega a la lista roomList .
Tenga en cuenta que el valor del control deslizante representa el límite y el buffer el valor leído por el sensor. El búfer se expresa como un porcentaje, por lo tanto, la división por 10.
app.fillRoomList = function(callback) // Fill the list { var roomList = $('#roomList'); roomList.empty(); // Empty the list if (app.values.length) // If there are some values { for (var i = 0; i < app.values.length; i++) // For each room { if (localStorage.getItem('limit' + i) === null) // If the limit hasn't been set yet, set to 100 (lowest) { localStorage.setItem('limit' + i, 100); } var limit = localStorage.getItem('limit' + i); // Limit for the room var state; // State of the light if (app.values[i] > limit) { state = 'on'; } else { state = 'off'; } var element = $( // Element to be added in the list '<li>' + '<h1>Room ' + i + '</h1><br>' + 'Light is <strong>' + state + '</strong>' + '<div class="slideBar">' + 'Slide the bar to change the limit<br><br>' + '' + '<br>' + '</div>' + '' + '<br>' ); roomList.append(element); // Append the element } } callback(); // Configure the slider once all the element are added to the list }; La función sendLimits crea un mensaje a partir de un #, que contiene los límites separados por una / y terminando con un * y lo envía a la "madre" Arduino.
app.sendLimits = function() // Send the limits to the transmitter Arduino { var message = '#'; // Start the message with a '#' for (var i = 0; i < app.values.length; i++) { message = message.concat(localStorage.getItem('limit' + i)); if (i < app.values.length - 1) { message = message.concat('/'); // Separate the values with a '/' } } message = message.concat('*'); // End the message with a '*' app.sendMessage(message); // Send the message } };
